Easter special: Masala roast poussin (Murgh Musallam)

0 nhận xét

IMG_3242
I'm back after a fabulous weekend in Jersey Island with the husband, and the week before, a couple of us girls had taken off to the beautiful Cotswolds. The girls weekend away was so totally worth it, and we had some serious amounts of adventure, to say the least. From non stop gossip sessions, to happy hours at the tiny village we stayed in, to acting silly in the middle of the night, to having a flippin swan torture the daylights out of me, this trip shall never be forgotten. Without having time to get over the Cotswold trip, I packed my bags and joined the husband in the tiny, but gorgeous island of Jersey, 14 miles off the coast of France. We wined and dined in some amazing restaurants, explored the pristine beaches, spa-ed, got tanned and got back last night exhausted. Considering the fact that I had a hectic weekend, this post would not have happened any time now. But I promised a few I'd post this before Easter so they could try it out and I had to keep my word.

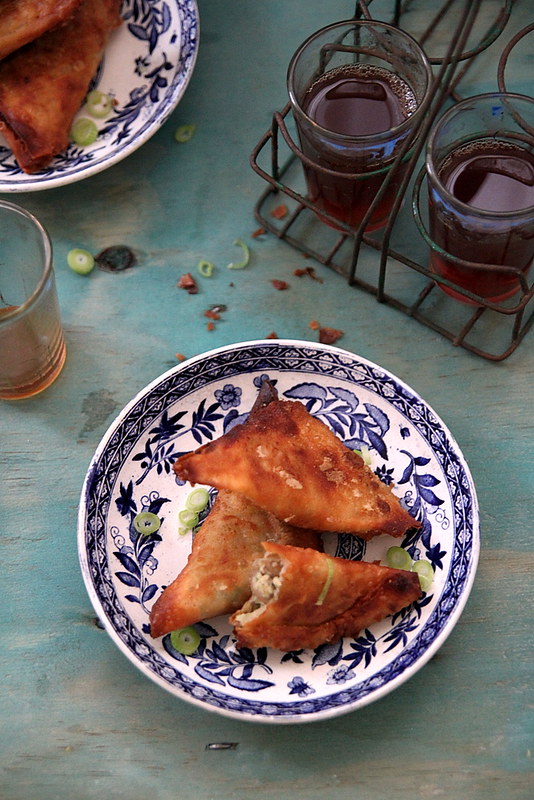
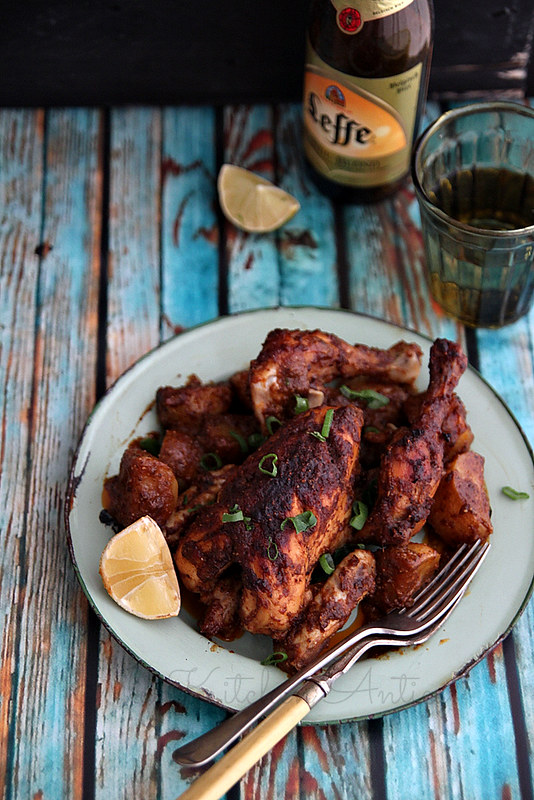
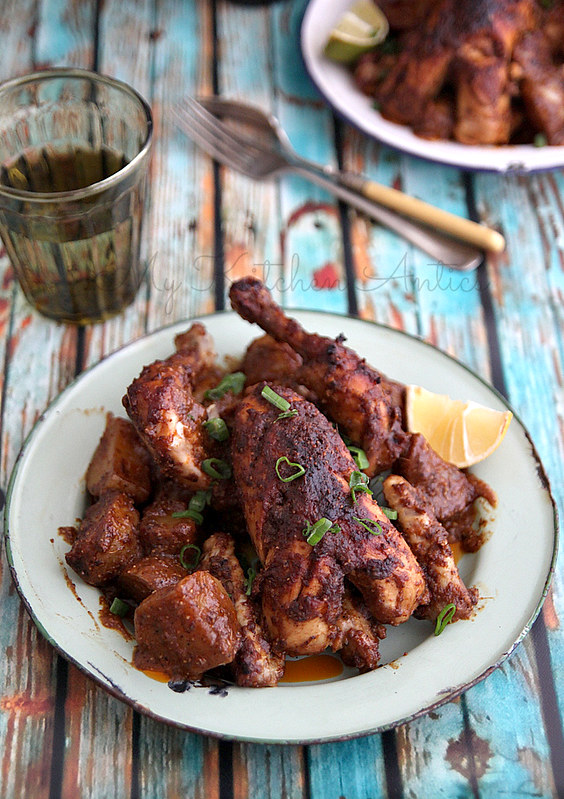
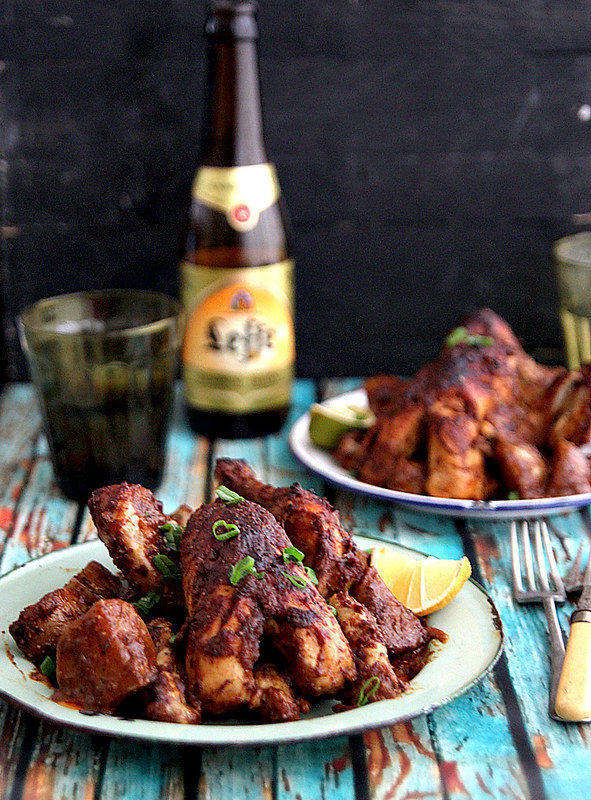
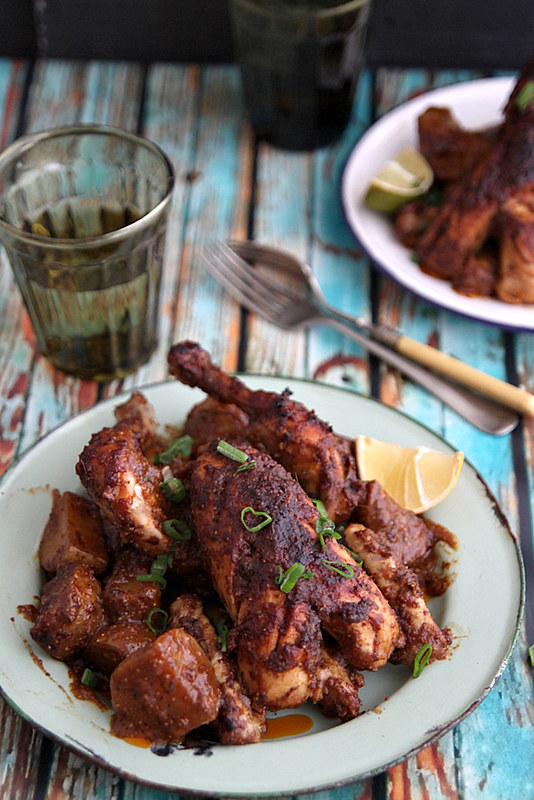
So- Murgh Musallam- from what I read up is a Mughlai dish, pretty rich in flavour and absolutely tasty. When Kulsum posted the recipe on her blog, I knew I had to try it. Each time I scouted for a chicken recipe, I'd land on this one, but I somehow thought it was a time-consuming one and left it for a day I was actually enthu to cook. Sadly, that day never came. But now that Easter is just a week away, I thought I should do a roast with an Indian twist and studied Kulsum's recipe again. Me being the lazy bum, went ahead and followed her recipe, but with the obvious short cuts. I just marinated everything together, added some potatoes and cooked it half on the stove top, and finished it off in the oven. The Gressingham poussins just made it even more easier, and somehow, roasting a whole bird gives it that fancy edge. They are absolutely easy to handle, and since they are small, the masala works its way into the thick breast bits, and takes much lesser time to cook. Gressingham also does duck, turkey, guinea fowl, quail etc, so if you're up to some experimenting this Easter, you know where to shop.

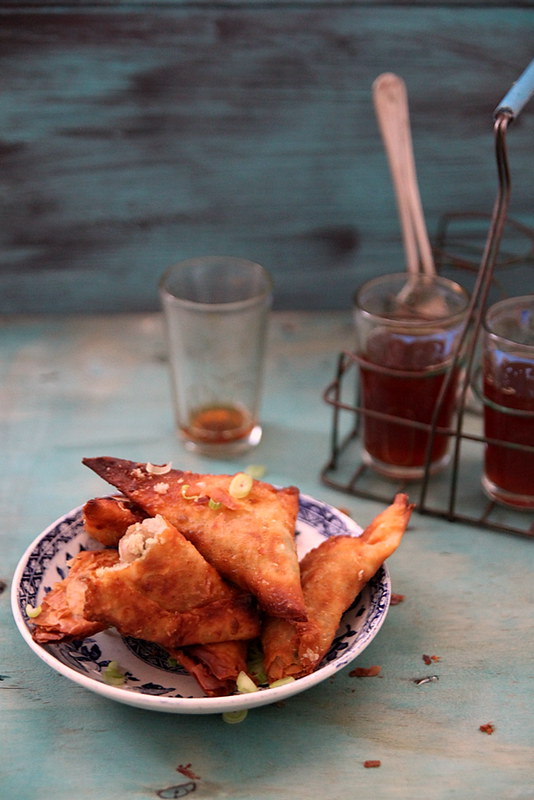
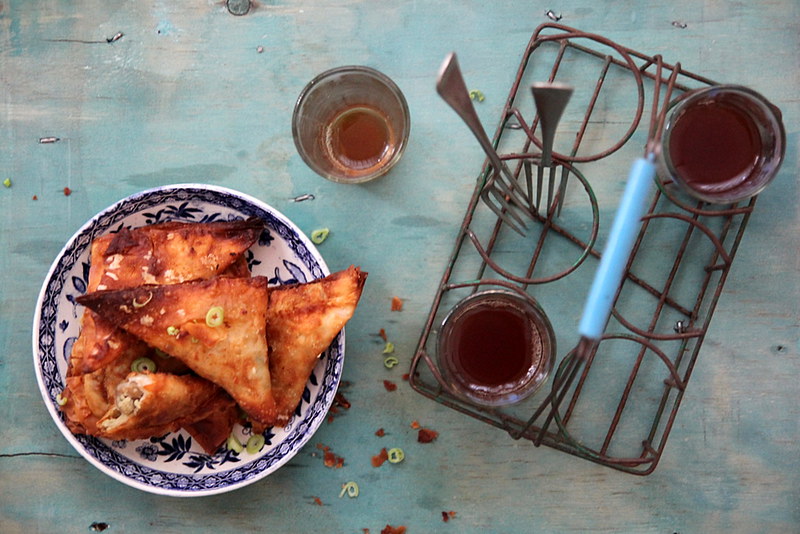
Add some baby carrots, parsnip, cauliflower etc and it can be an Indo-Western dish for sure. Its seriously tasty, especially the gravy, and the next day I had it with rice, and it was even better. I think traditionally its served on a bed of pulao and stuffed with eggs or something like that, but for me, this totally hit the spot.

Recipe adapted from here
IMG_3215 
Poussins- 2, approx 450gms each, skinned and cleaned (I used Gressingham poussins)
Baby potatoes- 6 to 8, quartered or halved depending on size

To grind
Fried onions- 4 tbsp* (refer notes)
Cumin seeds- 1 tsp
Coriander seeds- 1 tsp
Cloves- 2
Cardamom pod- 1
Poppy seeds- 1 tbsp
Chilli powder- 1 1/2 tsp
Black peppercorns- 1 tsp
Garam masala- 1 tsp
Powdered almonds- 1 tbsp

Ginger paste- 1 tbsp
Garlic paste- 1 tbsp
Green chillies- 2, small, finely chopped
Tomato paste- 1 tsp
Yoghurt- 4 tbsp
Salt- to taste
Ghee- 1 tbsp
Oil- 1 tbsp
IMG_3225
Grind together all the ingredients under the 'to grind' section. Transfer to a bowl.
To this, add the ginger and garlic paste, green chillies, tomato paste, yoghurt and salt and mix well to get a thick paste. 
Add a few tea spoons of water if you think the mixture is too thick.
Place the poussin's on a plate and make long insertions on the flesh (for the marinade to seep in).
Generously apply the marinade on to the birds, and also stuff some into the cavity, reserving about 2 tbsp of it for later use.
Cover with cling film and marinate in the refrigerator for at least an hour. I had time, so i kept it in there for about 2 to 3 hours. Best left over night I believe, but who has that sort of time and patience ;)

When ready to cook, heat a deep pot/pan, large enough to fit the 2 birds and pour in the oil and ghee.
When really hot, add the poussins one after the other, and sear on all sides.
You don't need to cook the chicken here, just need it to be lightly browned all around. Its a bit difficult to move them around, so I used my big kitchen tongs to flip it and such. 
Once the chicken is nicely seared on all sides, take them out and drain on paper towels.
Into the oil (add a bit more, if there isn't much remaining in the pan), add all the remaining marinade. Scrape the bowl clean.
Sauté for a couple of minutes, till the raw smell disappears.
Into the masala add the baby potatoes and fry for about 2 to 3 minutes, making sure the potatoes are well coated in the masala.
Return the poussins back into the pan, adjust the potatoes around them, add about 1/4 cup of water and cover and cook on medium heat.
Keep checking in between to make sure it doesn't burn and if you feel its getting too dry, then just add more water. I did add a 1/4 cup more.
Keep pouring the gravy on top of the poussins to keep them moist, and also try and stir the potatoes without breaking them.
Once both the potatoes and poussins are cooked (check by inserting a knife into the most thickest part of the bird and if juices run clear, you are good to go), transfer them into a baking dish along with all the gravy/
Grill under the broiler for about 10 minutes, just to crisp the tops. Of course, this step is purely optional.
Once done, take the dish out and let it rest for about 5 minutes, before you attack.
Serve with crusty bread and salad, or even with rice and roti.
IMG_3199
Notes: *The fried onions I used were store bought. If you don't have that option, then deep fry 2 small red onions till brown and crisp and use that instead. Make sure you don't burn them, or else they would taste bitter.
Use 2 tbsp vegetable/ olive oil instead of ghee.
You can of course use one chicken instead of two small poussins.

Sponsored video: #GETSQUASHD with Robinsons

0 nhận xét

I loved the movie Gravity. Well loved it mostly because of George Clooney and after they killed him off (sorry for the spoiler, but I presume most of you would have seen the movie by now)..which was after the first half hour or so, I kinda lost interest. I still sat through the movie, but wishing Mr Clooney would miraculously appear. The movie went on to win 7 Oscars including Best Visual Effects... which brings me to the #GETSQUASHD campaign by Robinsons (yes, the squash people). These sachets of squash are small enough to fit in your pocket but is strong enough to make quite a few glasses of drinks. I'm definitely going to try it out, especially the apple flavour.

Robinsons decided to take things to a different level by challenging the Oscar winning VFX team behind Gravity to GET SQUASHD in zero gravity. Do they succeed in doing so? Well, you will just have to watch the video and find out for yourself. 

The best part however is that you could take on the challenge to GETSQUASHD as well. All you need to do is put a Robinsons SQUASH'D in your pocket, get out there and #GETSQUASHD and send over the proof. You could be the lucky one to win a GoPro Hero 3.

Check out the other entries and upload your own #GETSQUASHD video on their website

This is a sponsored post for Robinsons

Macarons for grown ups- Cosmopolitan and Mojito macarons

0 nhận xét

IMG_2883-1
OK! I'm super duper excited about these macaron flavours and even more about the photographs, that turned out exactly the way i imagined. It was a crazy week of baking for us at Bobo Macarons. More than 1000 macarons baked, printed, filled and packed for a wedding and I was beyond exhausted. I did not want to do any baking for a really long time, or so I thought, until this fabulous idea for flavours developed in my head. I HAD to make it immediately. And so I did.
IMG_2844
I decided to go with two of my favourite cocktails- Mojito and Cosmopolitan. I make these at home quite often and I'm soooo in love with the flavours, it HAD to work in a macaron. I must admit though, it wasn't easy. I wasn't sure how to make the flavours pop and if adding liquid to the filling was a good idea, but I had to give it a go to see if it was feasible...and well, here they are...spot on with the cocktail flavours. Next on the list is margarita and sangria and maybe even a pink champagne one ;)

I have a basic macaron recipe that I fall back on and it fetches me perfect results. I halved the batter and added hot pink to one set and kiwi green to the other. I got 12 macarons in each colour. For the mojito macarons, I grated some lime zest and sprinkled over the shells about 10 minutes after I piped them out. This totally made a difference.

Mojito Macarons
IMG_2889
The mojito ones- lime, mint and rum being the main ingredients, were easy to put together. I mean I decided to do a white chocolate ganache filling and incorporate these flavours into it, keeping the base simple. I would however increase the alcohol a bit more the next time, as the lime was overpowering (in a good way, of course) with this batch. I'm so kicked about how the styling for this came through and its one of my favourite shoots till date.

Double cream- 45ml + 1/4 to 1/3rd cup to whip
White chocolate- 2 oz, roughly chopped
White rum- 1 tbsp
Lime juice- 3 tbsp
Lime zest- of one lime
Mint leaves- 2 to 3, finely chopped
IMG_2877
Gently heat the double cream, either in a sauce pan, or in the microwave and pour over the chopped up white chocolate. Keep aside for a couple of minutes.
Gently stir, without incorporating air into it, till you get a smooth mix. Keep aside to cool.
Add the rum, lime juice, lime zest and chopped up mint leaves and mix it in well.
Keep refrigerated till ready to use.

When ready to pipe, whip the ganache with 1/4 to 1/3rd cup of double cream with a hand held blender or in a free standing mixes with whisk attachment, till stiff peaks form. Make sure you don't over do this, or you'll end up with split cream.
Transfer into piping bags and pipe on to macarons and sandwich them.
Keep refrigerated in an air tight container till ready to use.

Cosmopolitan Macarons
IMG_2839
These - taste wise- were spot on but I did have a bit of trouble getting the right consistency. I used a butter cream filling for the macs and the amount of liquid that went into it, made it a lot difficult. I know that vodka is an important component in a cosmo, but i shied away from it because of the Cointreau and cran juice that was already making it quite fluid. I had to keep adding icing sugar to reach the desired consistency, which meant, the filling was a bit too sweet for my liking. I will find a way to work around that, but for now here's the recipe. 

Unsalted butter- 55 gms, at room temperature
Icing sugar- 6 tbsp
Cointreau- 1 tbsp
Cranberry juice- 1 tbsp
Orange zest- 1/4 tsp (optional)
IMG_2853
Beat together the butter and icing sugar till light and fluffy.
Add all the liquid ingredients plus zest and continue beating till they all come together.
If the mix looks like its curdled, add some more icing sugar to bring it back to desired consistency.

Beef Moussaka

0 nhận xét

IMG_2758
My boss is a brilliant cook- you know- the types that can whip up something with whatever is in the pantry and make a fabulous meal out of it. She refuses to let me take lunch to work which means I get to enjoy her fabulous cooking. I have learnt so many new methods of cooking, easy to make dishes and new ingredient names, and always come back home and try them out much to Ro's amusement. He's secretly thanking her, I'm sure :) 

Last week I was whining to her about how planning daily meals were such a feat and she gave me this idea to cook with aubergines. Both Ro and I were not aubergine fans till a while back when we went to an aunts place for lunch and she served baingan bhartha with biryani. We loved it so much that we got the recipe from her and tried it at home. As expected, it wasn't even close to what we had in mind and so gave up. After that, I may have tried working with aubergines about 5 or 6 times and 3 of those (successful ones) have appeared on the blog (actually one of it is what my friend Rashida made and sent over, so not counted). Aubergine parmigiana was another successful one and we loved it, but pictures were rubbish and hence couldn't blog it. 
IMG_2747
So anyways, Dora gave me this really easy recipe to cook with aubergines and I got all worked up at how easy it was. But of course on the 1 hour train ride back home from work my mind decided to go on overdrive and research aubergine recipes. Moussaka was up there on search results and yes, it had to be made that evening. I went straight to the grocery store to pick up ingredients (of course got carried away and bought a whole lot of other rubbish as well) and came back home all ready to cook. Its a bloody long process- this thing called Moussaka. When I read the recipe, I had no idea how tedious it was and many times during the process I wanted to just cut it short and make something else out of it. The fact that I could make a blog post out of this was at the back of my mind and I think that's what made me determined enough to continue with the actual process. (Some good has come out of owning a blog i guess??)

At the end of it all, I must admit, it was thoroughly worth it, like really really worth it. Both Ro and I enjoyed it and I made a note to experiment with aubergine again. I served it with a fabulous salad I learnt from an aunt this time i was in India (will try and blog it some other time) and a gorgeous bottle of red.

Word of caution: Attempt ONLY when you have time.

Recipe adapted from here (serves 3 generously)
IMG_2749 
Olive oil- 2 tbsp
Onion- 1 large, finely chopped
Garlic- 4 cloves, peeled and finely chopped
Minced beef- 450 gms
Cinnamon powder- 1/4 tsp
Oregano- 1/2 tbsp, dried
Allspice- 1/4 tsp
Bay leaf- 1
Thyme leaves- 1/2 tsp, dried
Tinned, chopped tomatoes- 1, 400 gm tin
Dry white wine- 90ml
Aubergines- 3 medium, cut into 1 cm slices
Pepper- to taste
Salt- to taste

Bechamel sauce (topping)
Butter- 45 gms, unsalted
Plain flour- 45 gms
Milk- 450ml
Parmesan cheese- 45 gms
Gruyère cheese- 50 gms, grated
Egg yolks- 2
IMG_2750
Place the sliced aubergines in a large bowl, sprinkle with salt and leave aside for about 30 minutes. This will draw out any bitter juices.
Heat the oil in a frying pan and cook the onions for about 10 minutes on medium heat. The onions should turn soft, but not brown.
Add garlic and sauté for a couple more minutes.
Into this add the mince meat and break it up, while mixing it into the sauteed onions.
Stir in the cinnamon, oregano, allspice, thyme and bay leaves followed by chopped tomatoes. Stir it all together till well combined.
De-glaze the pan with white wine, season with enough salt and pepper and cover and cook for another 15 minutes or so on medium heat, till the meat is cooked and the mix is thick.
Once the sauce is ready, cover and keep aside

While the meat is being cooked, you can deal with the aubergines.
Preheat oven to 200C
Rinse the aubergines in a colander and pat dry with a kitchen towel.
Toss with some olive oil and line on 2 baking trays, trying not to overlap.
Bake for 20 to 25 minutes, or till the slices turn a light brown.
IMG_2735-1 
To make the bechamel sauce, melt the butter in a saucepan and stir in the flour.
Take off heat and slowly whisk in the milk.
Return pan to heat and continue stirring till the sauce thickens.
Simmer for a further 5 minutes on low heat and then remove from heat.
Stir in around 30 gms of parmesan and gruyere cheese, season with salt and pepper and keep aside to cool lightly.
Once cool, whisk in the egg yolks till no trace is visible.

Once all the preparation is done, you can assemble the moussaka.
Into a large baking casserole/ dish generously spread a third of the mince.
Cover with aubergine slices, overlapping each other.
Repeat the layers, ending with a final layer of the mince.
Finally pour over the bechamel sauce, sprinkle both the remaining cheese and bake for 40 to 50 minutes or till it bubbling and golden on top.
Take the casserole out of the oven, leave aside to settle for about 5 minutes before slicing and serving.
IMG_2743
Notes: Yes, its a frikkin long recipe and procedure. Atleast 2 hours including prep and cooking
Bechamel sauce can be made a day or 2 ahead and refrigerated in an air tight container
Try and serve it with a refreshing salad or some bread, to cut through the grease and cream.
Traditionally Moussaka is made with lamb mince but I'm not a big lamb fan, hence used minced beef. Feel free to replace the beef with lamb mince. 

Beaten coffee (Indian Cappuccino- without a fancy machine)

0 nhận xét

IMG_2693
I love my morning cup of coffee. Or rather used to. Now I just drink that pathetic coffee from a cafetiere, that too sometimes after about an hour or so after its made. I remember being fussy about my morning coffee and I also remember having to let go of that fuss just because making a decent South Indian style filter coffee was just too much work, first thing in the morning. This way, Ro makes us both coffee in the morning and I just gulp down that watery concoction without any complaint. Well I did complain about my lack of a decent coffee once in a while, and my request for one of those fancy Nespresso, cappuccino makers fell on deaf ears. Instead, me and my girl pals go and indulge in an expensive cup of coffee at one of those artisan coffee shops once in a while. No its doesn't solve anything, rather it just makes things worse because you'd know what a good coffee actually tastes like.

I get this coffee fetish from my mom i suppose. She makes the best coffee and I kind of miss that now, especially because I got to enjoy it almost every morning last month. She likes it super duper strong with loads of sugar, and what do you know..i like it exactly that way too. This coffee drink, very similar to a cappuccino in taste, was made quite regularly this time. If decoction coffee was not available (since it takes a while to make), this was the coffee of choice. I learnt how to make it, for those evenings you crave a good cup of coffee and of course, to remember home where everything was just perfect. 
IMG_2704
The trick is to froth up the mixture and the quantity of milk makes that happen. Keep adding a few drops to start with and slowly increase, if you feel its needed to get the mix going. It loosens up after a few stirs and so add only after you do so. There is no particular recipe for this coffee, its more like a do-as-per-your-taste kind of a thing, but just for keepsake, here's an outline of what goes into it. Really, try this out and you wont ever need a fancy machine at home.

PS: A special thanks to my good friend Rashida for sourcing that gorgeous chai carrier from a chai wallah. I know she went through quite a bit of trouble to get the authentic one and I am so glad I have friends like these who absolutely understand my prop obsession. 
A big hug to Manjiri who brought me tea glasses from Mumbai to complete the whole look. Thanks darl.
And lastly, a group hug to my mum, my aunts and my neighbours back home who I harassed non stop for those thin cut glasses (the one you see in the foreground) that are extinct in Kerala (apparently), and to the old uncle who let me raid his shelf to find 2 that fit my imagination perfectly well. :)

Makes 2 (strong) cups
IMG_2724
Instant coffee powder/granules- 2 tbsp (reduce it if you don't like your coffee too strong)
Sugar- 4 to 5 tsp (adjust according to taste)
Milk- 1 1/2 cups (at least 4 % fat)
Water- 1/2 cup
IMG_2726
Tip in the coffee powder, sugar and 1 tsp cold milk into a cup large enough to handle 2 cups of liquid. I used my measuring cup for this.
Using a spoon, vigorously mix it all up, like it stirring motions. The mix would be dark, almost blackish in colour when you start off and as you keep mixing, the colour would lighten and slowly start getting creamy and frothy.
Keep stirring (vigorously being the key word) till the mix turns to a light brown colour.. I wish i could explain this better, but you'll understand when you see it. It would be significantly different from what you started with.
Keep this mix aside.
Bring the milk and water to a boil a saucepan. 
Give the coffee mix one last proper stir and into it pour the boiled milk..slowly.
Mix gently, do a taste test for sugar , pour into individual mugs and enjoy.
IMG_2706
Notes: As you can see from the picture, my coffee was really strong which invariably means I need more sugar. You know how much sugar and coffee you need so add accordingly. The only thing to remember is the milk. Add just a few drops, enough to get the mix moist. If there's a lot of liquid then it doesn't foam up too much.
A milk frother should be able to make the stirring a bit easier. Haven't tried it, so don't take my word for it.
You can do the same with cocoa, sugar and milk too
I've said at least 4% fat is a must. But if you are using low fat milk, then make that 2 cups and omit the water.

Launching People- a celebrity mentorship programme by Samsung

0 nhận xét

Here's a platform for all you film makers, singers, foodies and photographers. Samsung is joining hands with UK's hottest talent to give people an opportunity of a lifetime. 'Launching People' is a programme that will aim at helping those who want to launch a career in the respective fields. These talented artists along with Samsung, will search high and low for undiscovered talent in the country. They would aim at finding people with extraordinary potential and original ideas. The chosen candidates would then be guided on a one-on-one basis by their inspirational mentor and work towards creating a unique project. The journey from selecting the candidate, to working with the mentors, to finally launching the project will be documented and aired on television later in the year.

The celebrity mentors are:
Idris Elba- award winning actor, producer and DJ for the film category
Singer-songwriter, performer and actress Paloma Faith for the music category
For the food segment, Gizzi Erskine- the leading pop up chef and food writer and
Rankin who is a world famous portrait and fashion photographer mentoring the photography segment.

If you are food lover, budding film maker, musical game changer or photographer, then use this platform to pitch your brilliant ideas to those who are good in what they do, and can mentor you towards a great career. Andy Griffiths, President of Samsung UK and Ireland says, 'Everyone knows Samsung for launching products and every day we’re inspired by people who use those products to achieve amazing things. ‘Launching People’ is all about doing just that – launching people’s potential through technology, whatever their stage in life. We hope to give people with passion, ambition and a hungry mind, a launch pad for their bright ideas and change their lives in a positive way.'  

For us foodies, here's what Gizzi Erskine has to say. She is looking for someone who has passion and knowledge about food, and who is happy to be a little unconventional and break the rules. I'm sure there are readers out there who fit this bill to the T. Even if you don't, there is no harm in giving it a go. Who knows, maybe you'll be the next big thing in the food industry :)

This is how you can get involved:
Make a 2 minute video all about you and your ambition - a perfect chance to show off your passion, personality and your project idea to get the attention of the mentors. Add an image to it along with some copy and you're good to go. Log on to www.launchingpeople.co.uk to find out more, and you can also upload your submission there.

Up for grabs:
There are 2 opportunities for everyone:
1. The mentors will select four candidates with whom they'll work one-to-one. The chosen proteges will spend 2 to 3 weeks together, working closely with their mentors in a house fully furnished with Samsung's latest technology on their personal projects, building towards a grand launch event and making their ideas and ambitions a reality.
2. The public will get to vote for one winner in each category to receive GBP 500 for personal tuition and Samsung technology up to the value of GBP 2000.

Submissions are open till Thursday 6th March, 2014, and the final four will feature in a television series which will air on TV in spring this year
The 'People's Choice' winners, voted for by the public on Facebook, will be announced on Friday 7th March, 2014

There are so many of you out there who are so good in what you do, but have not been given an opportunity to shine in the field. So make use of this fabulous opportunity Samsung has put forth and make yourself proud.

Disclaimer: This is a featured post for Samsung. All views and opinions are my own. Photographs and videos are courtesy of Samsung Launching People.

Lemon madeleines

0 nhận xét

I know this post was supposed to go up a couple of weeks back, but that was me being optimistic about posting stuff on the blog from home. Horrible internet connection and working on a tablet is not really a favourite thing, and to add to it, blogger or flickr - one of these- were acting up, forbidding me to place images the way I want. Anyways, I had to have the post up and running because as part of my New Year resolution, at least a recipe post a week on the blog was a must. I actually don't have anything else in my drafts and if i need to keep with the resolution:
1. The weather must be significantly better for me to (want to) take pictures
2. I should get off my lazy ass and cook
3. I should unpack my bags and dig out the props i bought from India (really cool ones BTW)
4. I should get off my lazy ass and COOK!!!

After diving straight into work, today is my day off and I don't see any of the above happening. Its Valentine's day, and what I should actually be doing is to cook up a storm for Ro (who couldn't care less about VD) and then cuddle up and watch a movie or something. But all I'm thinking of is what cocktail I can make with the new bottle of Cointreau I picked up from duty free and how many varieties I can whip up with the mixers lying around home. (It's only 11.30am btw! Do I have a drinking problem??? No don't answer that). Its raining and unbelievably windy and I don't want to cant go out. Oh, and Ro is working from home and in about 15 minutes he's going to ask me 'what's for lunch.' I'm going to reply 'love and fresh air,' and then it might end up in an argument and we'd be the awesome couple who fights on every VD.
Ok so madeleines. When I visited Paris last September with my blog buds, one of the things on my 'to buy list' was a madeleine tray. We visited a couple of stores that sell cooking paraphernalia and they all had gorgeous madeleine trays, but bloody expensive. So I conveniently forgot about it and instead came back home with other rubbish.  

Imagine my excitement when I found a similar tray in TKMaxx for a third of the price. I had to pick it up and make madeleines immediately. So I did and they came out perfectly well. Its so easy to incorporate a flavour of choice into these and I chose lemon- i used my home made extract. Its just a basic sponge recipe and I'm sure you can make it without the molds, but then they wont be called madeleines, will they? I once saw a post trending on Pinterest where oven safe spoons replace the molds. They don't give you the bump, but they do look pretty madeleine like and is a substitute for the tray. 

Enjoy!

Recipe adapted from here (makes 18, 8cm madeleines)
Eggs- 3 large, at room temperature
Granulated sugar- 1/2 cup
Dark brown sugar- 2 tbsp
Butter- 1/2 cup
Plain flour- 1 cup
Baking powder- 1/2 tsp
Salt- a pinch
Vanilla extract- 1 tsp
Lemon extract- 1/2 tsp
Lemon zest- 1 tsp, freshly grated
Whisk together the flour, baking powder and salt in a bowl and keep aside.
Beat together the eggs and both the sugars on high speed, either in a free standing mixer with whisk attachment, or using a hand whisk, for about 5 to 8 minutes or till pale and thick.
While the egg mix is being whisked, melt the butter in a saucepan and keep aside. It should be warm to touch.
Into the egg mix add the vanilla and lemon extracts and the lemon zest and whisk till just combined.
Sift in the flour mix bit by bit, folding well after each addition. Do this slowly and carefully, as you don't want to deflate the egg mix. I used a silicone spatula to fold it in.
Take about 1 cup of this batter and mix it with the warm melted butter.
Whisk it in really well to make sure the butter has been nicely mixed in with the batter.
Add this to the remaining egg batter and gently fold it in till well mixed. (Its easier to mix a bit of the batter with the melted butter and then add that to the bigger batch. You also don't end up deflating the mix too much.)
Cover with a cling film and refrigerate for a minimum of 1 hour. You can also keep it up to 3 days in the fridge.
When ready to bake, preheat oven to 190C and generously grease a 2 12 mold madeleine trays with melted butter using a pastry brush. Also dust the molds with plain flour (tapping out the excess) to be on the safer side.
Drop a tbsp each of batter into each mold. It will be slightly domed in the centre which is precisely what you want.
Bake for about 9 to 11 minutes or just until the cake springs back when touched with a finger, or till the edges turn a light brown. Don't over bake it.
Take the pans out of the oven and immediately tap out the madeleines on to a wire rack.
Dust with some icing sugar and serve immediately with a cup of coffee.

Notes: I had only one 12 mold tray and so after i finished baking the first batch, i kept it aside for a few minutes to cool down and then repeated the greasing process. The dough was kept back in the fridge while the first batch was baking. The second batch also came out perfectly fine for me.
The madeleines are best had immediately, but it can also be stored up to 3 days in an air tight container in the fridge.

Chinese takeaway pairing with Cotes du Rhone Wines

0 nhận xét

I'm back after my month long vacation and I'm lethargic, to say the least. I had a great time travelling to Chennai and Bangalore, meeting up with family and friends and needless to say, gorging on mallu food day in and out. I fell sick twice, lost my voice, had to take 2 courses of antibiotics (something i hadn't done in years) and had an allergic reaction to a facial at the beauty parlour. Not so much fun, if you actually think about it. But I refused to let these issues dampen my spirits and still went about doing all those things I was asked not to do (like binging on street food) and gained a few kilos (damn you..slow metabolism).

So anyways, I'm back, and although the husband was holding fort while I was away, he looked mighty pleased to have me back (or so Id like to think)... even if its just to nag me. First thing out of his mouth was, 'can you make me a lemon drizzle cake please' to which my answer was 'no i need to make a lava cake because i have a submission in 2 days.' So poor thing ate the not-so-great lava cake and sat and listened to all my India stories. Getting back to cooking is kind of challenging for me even after a 2 day break from the kitchen, so imagine a whole month away from such activities? Torture!
The Chinese takeaway pairing challenge with Cotes du Rhones Wines came around at the perfect time and we thoroughly enjoyed a night in with glasses of red and some delicious Chinese food. The challenge was to show how easily the wines can be paired with all sorts of food, and since the Chinese New Year just got over, pairing the Cotes du Rhones wines with Chinese food was just apt. At this point I must tell you that Ro is a sucker for Chinese food. He can have it 365 days of the year and still drool at the thought of spicy pork ribs. I, on the other hand, like it but cant have it every other day and most certainly not the same thing every single time. But this time, being authentic-Chinese-food-deprived for so long, I thoroughly enjoyed all the usual stuff we order from our favourite Chinese joint, a stones throw away from home.

We ordered some fried prawns in butter and garlic as starter and stir fried mixed vegetables, Duck in chilli and black bean sauce and Singapore vermicelli noodles as part of mains. Opened the bottle of La Reserve de Camille Cayran - a smooth red, to serve with the prawn starter and at first i didn't quite enjoy the taste. A couple of sips later and I could vaguely figure out the fruity flavours. The smoothness broke down the grease from the butter and wiped out the pungent garlic taste which I'm not sure was what i was looking for, but it somehow complemented each other. The husband declared that the wine flavours were a bit too overpowering for the prawn starter.
The Cotes du Rhone Vidal Fleury, the blood red, almost blackish like wine was quite good on the lips. Medium bodied and quite an easy wine to pair i think, since it tasted fab with the slightly spicy vermicelli noodles and was absolutely gorgeous with the duck in black bean sauce. Both the wines failed to match with the stir fried vegetables, but that's just because the dish was pretty bland and didn't have any flavour attached to it. The wines just completely took over the flavour. Not complaining because we absolutely enjoyed the wines with the meal whatsoever.

We usually prefer a chilled beer or cider with our Chinese takeaway, and although we'd tried it a couple of times before with Chinese food made at home with less oil and salt, we were a bit apprehensive as to how we would make the match work with a takeaway option. With the slight miscalculation of the vegetable stir fry, i can very well say that the pairings were pretty decent and we'd definitely think about doing more wine pairings with everyday food. Opening 2 bottles of wine was not a good idea as we both went to bed pretty "content" :). We still have some more wine to polish off and maybe ill try and whip up a stir fry at home to go with that.

Cheers :)

With thanks to Rhone wines for inviting me to take part in this challenge and for the 2 bottles of wine that was sent over for the challenge. The bill for the takeaway was reimbursed.
Please drink responsibly. Visit drinkaware for more info.

The Magnetic Touch- Innovative products from Magnet Kitchens, 2014

0 nhận xét


We all have our dream kitchen. You know....the types that have been pinned innumerable times on Pinterest, seen in magazines and gawked at in stores. I have in my mind every single detail about 'the' kitchen that I would own one day. Since most us do tend to spend a lot of time in the kitchen.. err.. me being food blogger and all, I think it does matter how that little space of yours looks like. I would love a cozy lil kitchen with an aga and old copper pans and such, but in all honesty what i need is a nice modern kitchen- built in, with a small breakfast bar.


I walked into the Magnet Kitchen store in Wigmore street and I could very confidently say I found my dream kitchen (s). From dramatic ones with stylish islands and contemporary hob tops, to the perfect bachelor pad kitchenette, Magnet Kitchens have it all. I couldn't help but wish I was actually in there to pick out a new kitchen design for our home. Sadly, that will have to wait for a few more years and in the mean time I'd just have to take in Magnets new kitchen range which I must say are really impressive. 
Intergra Astral Grey- a smooth, uncluttered design which is both trendy and neutral enough to be paired with all sorts of different colours
Integra Fantasy Oak- a brown hued wonder which just makes you feel like you are in a summer cabin. The textured horizontal lines add to the refreshing design.
Leighton Grey for that country kitchen feel with matt grey finish and solid wood worktops.
Astral Grey with its smart glossy grey surfaces make it look very bachelor-pad-like I feel. Nevertheless, a beautifully put together colour combination can make it look simply fabulous.

What I'd like to however talk about are the new product innovations that Magnet has introduced. Their desire to keep designs fresh and more appealing inspires them to come up with new ideas regularly- ideas that you wont see anywhere else. The Coffee Unit, Illusion Sink and Sound Bar are 3 innovations that have been recently introduced, and I must say, they are a class apart. I was lucky enough to check out some of these products and here is my take on them.

Illusion sink


The illusion sink is perhaps the coolest kitchen feature I've ever seen. As the name suggests, its a sink you can see one minute, but not the next. When you install a sink in your kitchen, you'd like it to be fairly big right? But when the sink is not in use, the space is completely wasted. In such situations, the illusion sink comes in handy. When not in use, simply push down the tap and slide over a cover to create extra worktop space. The cover comes in the exact same colour as your work top (of course you can select your own too) and does look pretty neat when the cover is pulled over.

Sound bar

The slim and stylish sound bar system makes working in the kitchen a bit more fun. Making your favourite seafood paella while jiving to some Spanish salsa music is something we all would like to do in the kitchen...that too without having to worry about the wine spilling over your ipod or laptop. The sound bar blends seamlessly into the wall cabinets and if you link it to any device with Bluetooth capability you wont even know its there..well, until you hear it.
"Magnet provides a flexible full circle service that includes a smart design service, a 15 year cabinet guarantee, free home survey and the unique Smart Care service. The Sound Bar System is a system that can not only be incorporated into Astral Grey kitchen, it can also be fitted with many other Magnet kitchens."

To find out more about Magnet’s range of kitchens or to locate your nearest store, visit www.magnet.co.uk”

Disclosure: Compensation was provided by Magnet via Glam Media. The opinions expressed herein are those of the author and are not indicative of the opinions or positions of Magnet

Season's Greetings & Christmas Specials

0 nhận xét

How are last minute preparations for Christmas coming along? Are you frantically baking and cooking or relaxing with your feet up while your parents put together the Christmas feast? Either ways, I'm sure you are all looking forward to Christmas celebs tomorrow.

The husband has pushed off to India and I had to stay back because of a hectic work schedule and Id be joining him only in Jan. I was all ready to have frozen pizza and get drunk on wine on 25th, when a friend invited me over to hers for Christmas. Since the entire transport system comes to a standstill on 25th I am heading to hers tonight, attend a midnight Christmas service at the church and ring in Christmas with friends tomorrow. I would have loved to be with family, but hey, I'm not complaining. Atleast I'm not having frozen pizza and watching Downton Abbey reruns in my Pj's.

Anyways, here's wishing all you guys a very Merry Christmas. Have a glass or two of wine on me and enjoy your day to the max. Leaving you with some fun Christmassy stuff ...

Oddka
I love my cocktails and am forever trying to recreate new ones at home, which means scouting the drinks aisle at the supermarket is a treat. I came across this vodka drink called ODDKA and was thoroughly amazed at the flavours on offer. Fresh cut grass.. seriously.. now that's a flavour I'm completely intrigued by. Other flavours include Electricity, Salty caramel popcorn, Twisted melon and Peach Bellini. As luck would have it, I was asked if I'd like to try some Christmas cocktails using ODDKA and how on earth could I say no? Since I'm home alone, I've not really made any cocktails as yet but if I have a girls night out around New Years, I'd definitely be trying out a few cocktails from the list ODDKA has put together. If you do want to try something different this Christmas, then head on over to the ODDKA website and give some of their cocktails a go. Your local Asda or Sainsburys should stock a few flavours of ODDKA.

Castello Cheese
I received this really adorable Christmas stocking, with my name on it and all, filled with Castello Cheese. I had big plans to make Ronnie Murray's Baked leek tart with Castello Jersey Blue and I even bought all the ingredients, but with crazy work schedules I had to put the cooking on hold. I shall definitely give it a go one of these days I'm home. The Castello range includes Creamy Blue, Creamy White, Traditional Danish Blue, Extra creamy Danish Blue, Pineapple Halo i (I made a macaron filling with the Pineapple cheese), and the latest addition just in time for Christmas is the Tickler Cheddar, with a sweet, strong and tangy taste. If you are doing a cheese platter for the parties, don't forget to include this one, its a winner. Pair it with a Rioja Gran Reserva 2001 or a an Italian Barolo wine.

Christmas food and drink matching
Pairing the right drink with the food you serve is really an art. I try hard to actually do this and mostly, because of lack of knowledge, I just do a theme and follow with drinks from the same cuisine. When you do a large spread like for Christmas, this becomes a bit of an issue, especially when you have invited people with different tastes. To make matters easy for people like me, Waitrose has teamed up with wine lover Philip Schofield and wine connoisseur Olly Smith to develop a food and wine matching guide to get the combinations right. The infographic gives you a basic knowledge of pairings which would help you manage your Christmas meal pretty easily. I am sooo going to keep this for future references. There are also some great videos here for some festive inspiration

Parmigiano Reggiano Christmas Cook-off
Parmigiano Reggiano (PR) is one cheese I regularly use in cooking- in soufflés, bakes, dips and just to grate atop pasta. I was recently invited to a Parmigiano Reggiano Christmas Cookalong organised by the Consorzio del Formaggio and lead by top chef Valentina Harris. We started off the evening tasting some amazing starters like dates filled with PR and wrapped in Parma Ham, PR lollipops with sesame seeds and chilli (an absolute favourite) and a 30 month matured PR with balsamic vinegar. We were then split into two teams and set about creating our meal for the night- Venetian duck stuffed with a PR mix, Fennel topped PR and Rosotto PR. It was my first time cooking with duck, and although not really a favourite, I quite enjoyed the whole cooking experience. Highlight of the evening, however, was cracking open a 45kg PR wheel which we all got to taste, after which we all sat down to a fabulous meal. After an evening of like minded food enthusiasts and after gaining such indepth knowledge about PR, I cant wait to cook with the cheese. For more information and recipes check out the website

With thanks to all the brands for inviting me to their events and for review samples.

Home made lemon extract (DIY edible Christmas gift)

0 nhận xét

IMG_2320
Every year I have major plans of making edible gifts for my friends. Last year I started off with good intentions; to make a hamper of sorts with all cool edible gifts... because you know food blogger and all, people would be more happy to receive things to eat than onesies form Primark. Since sending edible gifts by post to parents in India was not an option, I thought of making a recipe calendar for them with my "gorgeous photographs (self-proclaimed of course)" and recipes. I harassed Ro so much about the calendar - software to use, how to get dimensions right, where to get it printed etc etc- that he finally lost it and asked me to just do my own shit.
IMG_2289-1
And that's exactly what i did... wasted A LOT!!!! of time with the damn calendar. The thing is, I have this image of how it should be in my head and I have to get it that way no matter what. The fact that I was challenged with high end photo editing software meant I had to use Picasa and PicMonkey to take care of my needs, and unfortunately my needs exceeded the basic help these options left me with. So by the time I got to month March it was around 30th of December. No way was I going to finish the remaining 9 plus the main cover in less than a month. So there, that conveniently ended my calendar plan.

You might wonder if I at least completed my edible hamper idea.. nope that also didn't happen in spite of pinning tonnes of packaging and labelling ideas and looking forward to making them. It actually made me wonder if I was more interested in packing and labelling things, than making the edible gifts. The only thing I finally did was send these cupcakes to my neighbour..yes in that red plate itself. Shame on me, I know!!
IMG_2329
This year, I started early, in spite of a crazy work schedule. These home made lemon extracts are proof that I actually have edible gifts to send out to friends. The old me would have waited till 24th December to infuse, but no, I'm 17 days early and patting my back for being proactive. They will be one of the gifts my lucky friends receive. My non alcoholic friends will of course get some edible goodies which i'll try and blog before Christmas, but no promises.

First on the list will be the Christmas themed cookies I'll be making with the new OXO Good Grips Cookie Press. This fabulous gadget not only lets you whip out cookies of same size, but you also have the option of selecting from 12 different shapes with snowflake, wreath and tree definitely going into my Christmas gift box. The daisy, buttercup and sunflower are a personal favourite so I'm going to include that too for good measure. The stainless steel blades are dishwasher safe and can be easily stored in the box that comes with the gadget. The cookie press will be available in Lakeland from January 2014 and if you want to make loads of cookies at one go then this is the gadget to have.
18405_1
Lemon extract basic recipe adapted from here (makes 3, 236ml bottles)
Vodka- 3 cups (any quality is fine)
Lemons- 5 to 6 (make sure they are organic, unwaxed lemons)
Glass bottles with lid- 23 to 250 ml

Sterilise the bottles by washing them in warm soapy water and then leaving to dry completely.
Wash the lemons and wipe them dry.
Peel the lemons with a zester, making sure none of the white pith comes along with the zest.
Carefully add the zest into the bottles. I added around 2 lemons per bottle for a strong flavour. 
Pour in 1 cup of vodka per bottle. If you use a measuring jug with a beak, it would be much easier, or a funnel.
Seal with a lid and store in a cool dark place.
Gently shake it everyday, for about 1 week or so, or alternate days at least.
When ready to use, either strain the fruit and use or simple keep using the extract as and when required with the peel still in the bottle.
Dress the bottle and its a perfect Christmas gift.
IMG_2344
Notes: I bought my bottles online at a very reasonable price
I chucked a slit birds eye chilli into one bottle
My next set of 3 will be orange extract. Use one large orange for each bottle and follow the procedure mentioned above.
You can actually go crazy with infusing vodka- vanilla, rosemary and lime, raspberry, blackberry, mango, peppercorns- are on my to do list. If you do want to give it a shot, just eye ball the measurements based on how strong you'd like them to be and use accordingly.
Add the extract to bakes, cakes and custards or add some simple syrup and use in a cocktail. 

With thanks to OXO Good grips for the review sample.

Comte cheese and spinach tart

0 nhận xét

IMG_2204 
This is probably the easiest tart I've ever made. I say so with confidence because I was under pressure to have lunch ready with a husband breathing down my neck.

Ro has this habit of heading to work late, especially if he has an early morning conf call to take which he does from home. It would invariably be on a day I don't work, which means by the time I wake up at around 9-ish and settle down with coffee and emails and such, Ro is well into his day. He usually heads into work around lunch time and catches lunch there, but last week he apparently changed his mind and asked me 'what are we having for lunch?' at 11.30 that too. I stared at him, then I stared at the contents of my fridge and seeing the ingredients for this tart, my eyes lit up. They were supposed to be dinner, but that was about 7 hrs away and I had enough time to figure it out. Warned him it would take an hour and he agreed. And there, the easiest tart I've ever made came into existence. 
unnamed (1)
Photo courtesy: Daniel Jones Photography for Comte Cheese

I attended a Comte Cheese tasting event beginning of last month at La Cave a Fromage. It was a fun evening with Comte cheese expert Claire Perrot giving us in depth knowledge about the complex flavours that Comte is all about. We then went on to taste Comte cheese from different terrains and ages and were asked to figure out how they tasted different, what flavours were persistent etc. I'm no expert at cheese, but the flavours i could get were so obvious, I was quite surprised myself. What amazed me the most was how a slab of cheese smelt completely different from a cut piece and how certain wine and champagne simply made eating cheese a pleasure. One of the pairings with Comte cheese was vanilla paste and I loved how they tasted together. Came back home with a goody bag and a huge slab of Comte cheese to experiment...and experiment did I.

This tart recipe is made using Comte cheese and I must say it tasted fab (don't forget how easy it was make the tart). I think this is going to be the base recipe for all my tarts and I can just play around with the fillings used. The original recipe used a polenta tart base, but remember husband breathing down neck? So short crust pastry it was!

Recipe adapted from the Comte cheese recipe card (makes 5 to 6 tartlets or one 24cm tart)
IMG_2191
Spinach- 200 gms
Comte cheese- 200 gms, grated
Crème fraiche- 150 ml
Single cream- 150 ml
Eggs- 3
Salt and pepper- to taste
Butter- to grease the tart tins

Short crust pastry- 1 slab/ roll

Pre-heat the oven to 180C and grease the tart tins with melted butter
Roll out the short crust pastry into a rectangle about 5mm thick and carefully lay it into the tart tin. I used mini tart tins so cut the pastry into 5 equal parts and then carefully laid it into the tins.
Place a greaseproof paper on top of the pastry case and fill with baking beans. I don't have baking beans so used rice instead. Works fine.
Bake in the oven for about 15 minutes, or until just golden.
Remove the paper and beans and bake for another 5 to 7 minutes to make sure the pastry is cooked through.
Remove from the oven and keep aside.
IMG_2216
While the pastry is cooking, you can go about getting the filling ready.
Wash the spinach and roughly chop it up.
Squeeze most of the water from the spinach and cook covered in a microwave safe bowl on high for about 3 minutes.
Drain the water that has oozed out and keep aside to cool a bit.
Meanwhile, mix together the cheese, crème fraiche, cream and eggs in a large bowl.
Season well with salt and pepper.
Once the spinach has cooled down a bit, layer the bottom of the cooked tart shells with spinach and pour over the cheese mix.
Gently stir to evenly distribute the spinach.
Bake for about 20 minutes or till the tart is just set and golden. If a knife inserted comes out clean you are good to go.
Take the tart out and cool on a rack for about 10 minutes before removing them from the tin.
Serve with a salad.
IMG_2223
Notes: Original recipe called for Swiss chard. If using chard, then wash, chop and cook in a bit of olive oil till wilted.
You can make the same tart using puff pastry as well.. in fact I prefer that to short crust.
Of course Comte cheese can be replaced with cheddar or rather any cheese of choice.
Use double cream in place of creme fraiche

With thanks to Comte cheese for inviting me to the tasting event and for the sample.

Christmas pudding ice cream

0 nhận xét

IMG_2250 
Last week, a bunch of us had a cook-along session on Google+ Hangout hosted by Great British Chefs and Tesco Real Food. We were cooking along with award winning Chef Galton Blackiston who runs Morston Hall, up at the Norfolk coast, and making Christmas pudding ice cream was on the agenda. It was my first time doing a hangout session like this and so was a wee bit nervous as to how it would churn out (pun intended).

We were asked to do a few preps before hand and jot down any relevant questions we wanted to ask Chef Galton during the session. It all went on extremely well and I'm completely amazed at how technology can just make things so much more convenient. I mean we were all in different parts of UK, in the comfort of our own kitchen and cooking along with so much ease. Except for a few glitches with the audio at times, it was an absolutely well thought out session. Thanks to GBC for this fantastic opportunity and to Chef Galston for the demo. You can watch it here.
IMG_2229
Now, I know its not the perfect weather for ice cream, but really this one needs to be made this Christmas y'all. We are all going to od on Christmas pudding and even worse, have tonnes of it left over. Chucking them into a custard base and churning them to make fabulous ice cream is THE way to go about using whats left over. I am not a big pudding fan or for that matter an ice cream fan, meaning I can just about have a slice or scoop of each, but when the two come together it just makes it so much better.

I had to try hard to not keep eating spoonfuls of custard while it was cooling down. So the ice cream base is a really good one, to experiment with. You can use it as it is with a kick ass sauce, chuck in some candied fruits, or add some nuts and such to make it appealing. Its pretty basic and except for the whisking bit, doesn't really take too much time. Those in India, remember the rum and raisin ice creams we get..well this ones sort of like that.. but a whole lot boozier..who's complaining about that now? :)

Recipe adapted from Great British Chefs (serves 5 to 6)
Single cream- 300ml
Milk- 150ml
Vanilla pod- 1/2, split length ways
Egg yolks- 3
Caster sugar- 62 gms
Christmas pudding- 125 gms, crumbled into pieces
IMG_2241
Add the cream and milk to a sauce pan and scrape in the vanilla seeds along with the pod.
Place the pan over medium high heat and bring to a gentle simmer.
Remove from heat and set aside to infuse for about 30 minutes or so.
In a bowl whisk together the egg yolks and sugar till pale and smooth.
Bring the cream and milk mix back to a simmer.
While whisking the egg, slowly pour  in the cream.
Pour the mix back into a saucepan and place over low heat.
Keep stirring continuously till you have a thin layer of custard that coats the back of the spoon.
At this point, take the saucepan off heat and pass the custard through a sieve into a bowl.
Allow to cool completely. Lay cling film on top of the custard to prevent a skin from forming.
If you want to speed up this process, place the bowl over an ice bath and keep stirring till it turns cool. I actually chucked it into the refrigerator for a while.

Once cool, you can either churn it in an ice cream maker, stirring in the Christmas pudding once the mixture begins to thicken and then freeze till ready to use.
If you don't have an ice cream maker, then pour the custard into an air tight container and freeze for about 30 to 45 minutes or till just about set.
Take it out, whisk well and then fold in the Christmas pudding gently, to not break it up too much. 
IMG_2265
Notes: This is a halved recipe
My air tight container was really good and so i only had to whisk the custard twice, at 1hr intervals and it was perfect. I also added the pud into the custard the first time and kept whisking gently each time.
I may not infuse the cream for 30 mins next time. Couldn't really find much difference.

I was paid for the ingredients and the time. Thanks GBC

Pastille (Israeli pastry) with chicken and caramelised onions

0 nhận xét

IMG_2142
Israeli cuisine is something completely new to me. I've been told that the flavours and dishes are mostly fusion in nature with Arab, Middle Eastern and Mediterranean influences, and from the very few dishes I've tried from Ottolenghi, I kind of understand the classification. So when i was invited to the Taste of Israel hosted at Restaurant 1701, in the grounds of Britain's oldest synagogue, I really couldn't say no. I was completely intrigued by the food that was going to be served and even more the Israeli wines that were going to be paired with the food. 

The event was designed to raise awareness of Israeli food in the UK and to break down cultural barriers with the power of food and cooking. WIZO, a charitable initiative brought down 3 renowned chefs who put together the Israeli feast for us. They trained at different WIZO supported institutions and I must say they did a fabulous job. 
Chefscooking2_zps3bf5ebd5
We were served dishes like pickled mullet with tomato nectar, gourmet lamb kebabs, sea fish medley with za'atar and pickled lemon etc., and they were paired with a selection of really good Israeli wines chosen by expert sommelier John Wriss of Kedem Europe, importer and distributor of kosher wine in the UK. My favourite dish, however ,was the halva cream with strawberries, rose water pistachio and kediff which I cant event begin to explain how amazing it was. In fact my mouth is watering just thinking about it. I did get hold of the recipe, but most of the ingredients were really difficult to source and so I thought of giving the Pastille recipe a go.

The traditional pastille is a sweet and savoury fusion dish, more or less like a puff pastry pie. But it was served like spring rolls at the event and I decided to make them like samosas just for kicks. It tasted great with duck, but I was a bit wary about cooking duck at home and so used chicken instead. It was not the best substitute but not too bad either. The ras-el-hanout spice lends a distinct flavour so try not to avoid it. I was about to buy it from the store when my generous boss offered me a small pack of the spice which her mum had brought down from Tunisia. Now it cant get more authentic like that I'm sure. Ive linked to a recipe which you can try, or most of the supermarkets do stock them. I know Sainsburys does.

Pastille with some hot mint tea is what you need to eat on a cold and windy Winter afternoon.

Recipe adapted from the Wizo UK Dinner menu (makes around 20 to 22 small pastille pockets)
IMG_2151 
Chicken- 500 gms, boneless and finely diced (1 to 2 inch cubes)
Onions- 2, finely chopped
Ras-el-hanout- 1/2 tbsp (follow this recipe to whip up your own)
Chicken stock- 125ml
Coriander leaves- 1/2 cup
Eggs- 3, small
Almonds- 125 gms, blanched and sliced
Tahini- 3 tbsp
Oil- 2 tbsp + enough to fry the pastille

Brik pastry or filo pastry sheets- around 10 to 12 (I used filo pastry)
Flour mixed with water to stick the edges if its brik pastry and melted butter if its filo pastry
IMG_2152
Preheat the oven to 170C and roast the almond slices in a baking tray for about 7 to 8 minutes or till they turn a slight shade of brown. You can do this on a skillet as well. Once done remove from tray and keep aside.
While that's sorted, heat oil in a frying pan and saute the onions till they become golden brown.
Add the chicken, season with salt, Ras-el-hanout and fry till brown, by stirring on and off.
Pour in the stock, bring to a boil and cook on medium heat for about 6 to 8 minutes or till the chicken is completely cooked and almost all of the liquid is absorbed.
Break the eggs into the pan and scramble for a couple of minutes, until the eggs absorb whatever liquid is remaining in the pan and becomes a crumbly scrambled mixture with the chicken. Make sure this doesn't get too dry.
Stir in the roasted almonds and coriander leaves and remove from heat.
Mix in tahini and keep aside to cool completely.

Once cool, you can assemble and fry the pastille.
Spread the filo pastry on a work surface and fold over so you get two layers. To make sure they don't come apart, lightly join together using melted butter.
Put about 2 tsp of filling (don't over fill it) and roll like how you do a samosa. if its too long, slice off the remaining. If you think rolling it like spring rolls is easier, feel free to do that instead.
Heat enough oil in a frying pan and fry the pastille in batches till about golden and crisp.
Drain on kitchen towels and serve with ketchup or chutney.
IMG_2162
Notes: Original recipe was made with duck slices. If using duck, follow the exact same procedure and measurements, just that duck may take a little longer to cook.
Its not a spicy dish at all. So if you want some kick, add a slit green chilli while sauteing the chicken
Once rolled in the pastry, it can frozen in an air tight container and can be fried directly from the freezer.

With thanks to WIZO UK for an invite to the Taste of Israel event

Minced pork and egg fried rice and Cooking with Kikkoman Masterclass

0 nhận xét

IMG_1968
I know...been almost a month since I posted here. I'm not going to give excuses blaming work, weather, this, that etc etc. Instead, I'm going to jump right into it and talk about the 'Cooking with Kikkoman masterclass'  I attended a month back at the fabulous Matsuri St James restaurant. Kikkoman is a leading brand of soy sauce and I regularly use it for all my Asian cooking. We networked over cocktails at the foyer before being escorted into the restaurant and seated around a Teppan table. Bing-yu Lee, Manager for Kikkoman UK gave a talk on Kikkoman- how it is made, how its different from the usual ones and we even did a blind tasting between two different types of soy sauces.
20131015_183731
Michelin Starred Chef, Simon Hulstone then took over and demonstrated how to use Kikkoman in a mean broccoli and scallop dish which we all got to taste. After a sushi making demo and a theatrical teppan-yaki meal cooked in front of our eyes we went on to enjoy our meal, full on, paired perfectly with wine.
20131015_185133
In our goody bag was a Kikkoman cook book and this fried rice is adapted from that. There are so many easy recipes and even though i made this rice a week after the event, it didn't make it to the blog because I wasn't happy with the pictures. I thought id make it again and take better pictures, but nope, that never happened and so you are gonna have to just believe me when I say the fried rice tasted simply good. Its really really simple to make and you should give it a go.

I went a bit crazy with the stir frying and that's why it looks like tiny grain. Its just that the rice broke while I got carried away. So be careful when you do the final mixing.

Recipe adapted from the Kikkoman cook book (serves 2)
IMG_1958 
Basmati rice- 1 cup
Water- to cook the rice
Oil- 1 tbsp
Minced pork - 300gms
Ginger- 1 1/2 tbsp, peeled and grated
Garlic- 2 tbsp, peeled and finely chopped
Spring onion- 1/4 cup, finely chopped (reserve a few greens for garnish)
Green chilli- 1, finely chopped
Salt and pepper- to season
Kikkoman soy sauce- 2 tbsp
Eggs- 2
Coriander leaves- 1 tbsp, finely chopped (optional)
IMG_1969
Cook the rice al dente. Drain and keep aside. Make the rice a day ahead and store in the refrigerator. This would make it drier- perfect for fried rice
Heat the oil in a non stick wok and add the minced pork. Stir fry on high heat till the meat changes colour.
Throw in the ginger, garlic, spring onion and green chilli and fry till the pork is cooked through.
Season with salt and pepper and 1 1/2 tbsp of Kikkoman soy sauce. Mix well and cook till the meat turns a bit brown.
Add the rice and stir fry on high heat continuously.
Whisk together the egg and remaining 1/2 tbsp soy sauce in a bowl.
Move aside a bit of the rice from the wok and add the egg. Scramble a bit, turn off the heat and leave covered for about a minute or two for the eggs to set.
Just before serving, garnish with the remaining spring onion greens and coriander leaves.

Notes: The original recipe called for chicken breasts. If using chicken (around 2 medium), dice them into cubes and do as above.

With thanks to Kikkoman for inviting me to the event and the goody bag.

 
  • The Best Blog Recipes © 2012 | Designed by Rumah Dijual, in collaboration with Web Hosting , Blogger Templates and WP Themes