Meyer Lemon Macadamia Nut Tart

0 nhận xét

I’m not usually a lemon kind of girl. Dessert, to me, is chocolate, chocolate, and more chocolate. Fruit tarts, lemon bars, and fruity crumbles on restaurant menus will always be skipped over in favor of the rich chocolate cakes and caramel custards. Maybe I’m missing out, but I’m never disappointed.
To be honest I was quite tempted to turn this into a chocolate lemon tart. An unusual combination, maybe, but it sounded intriguing and certainly more my style than plain old lemon.
However, I felt that my last precious Meyer lemons of the season deserved a more fitting send-off, a tribute that highlighted their vibrant yellow color and tart-sweet flavor, instead of being drowned in chocolate.
Meyer Lemon Macadamia Nut Tart
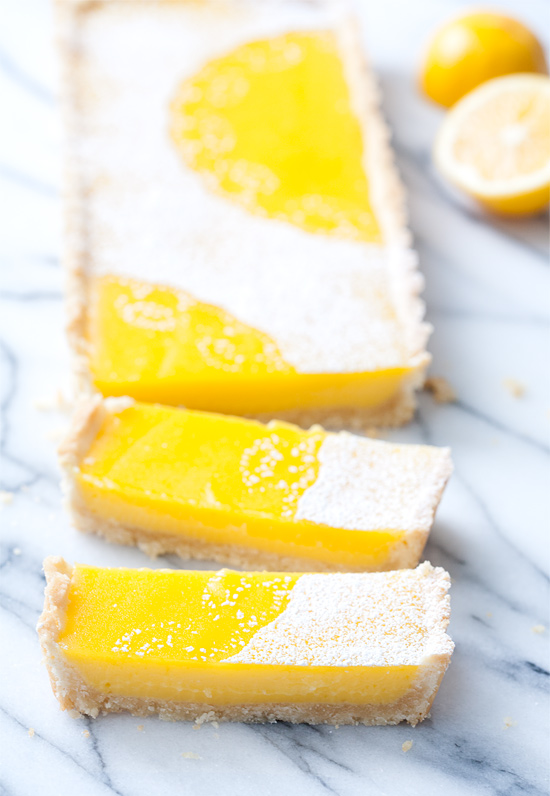
I’ll admit, this tart satisfies even the most devout chocolate-lover. It’s delightfully tart and lusciously creamy. I added a bit of a twist with the macadamia nut shortbread crust, which adds a buttery richness that compliments the vibrant lemon filling perfectly. Not to mention it circumvents the need for a temperamental pastry crust.
Granted, I probably won’t make a habit out of replacing my beloved chocolate desserts with lighter, fruitier ones, but in this case, it was a nice change of pace.

Meyer Lemon Macadamia Nut Tart


Yield: 1 9-inch or 4-by-15-inch tart
Total Time: 3 hours

Ingredients:

For Crust:

  • 1/2 cup macadamia nuts
  • 1 cup flour
  • 1/3 cup powdered sugar
  • 1/2 cup (1 stick) unsalted butter, cut into cubes
  • 1 tablespoon cold water

For Filling:

  • 7 large egg yolks
  • 2 large eggs
  • 1 cup (7 ounces) sugar
  • 1/2 cup grated fresh Meyer lemon zest (from 4 to 5 lemons)
  • 2/3 cup fresh Meyer lemon juice (from 4 to 5 lemons)
  • Pinch salt
  • 4 tablespoons (1/2 stick) unsalted butter, cut into 4 pieces
  • 3 tablespoons heavy cream, chilled

Directions:

  1. Preheat oven to 375 degrees F.
  2. To prepare the crust, place macadamia nuts in the bowl of a food processor; pulse until finely ground. Add flour and sugar and pulse until combined. Sprinkle cubes of butter over top. Pulse until just combined; drizzle in water and pulse one or two more times or until evenly moistened. Dough will be crumbly, but should come together when pinched with your fingers.
  3. Dump dough into a 9-inch-round or 4-by-15-inch rectangle tart pan with removable bottom. Firmly press dough into the bottom and up the sides of the pan. Bake for 11 to 13 minutes or until edges are lightly golden brown. Remove from oven and place on a wire rack to cool slightly while you prepare the filling.
  4. In a medium saucepan, whisk together the eggs and egg yolks. Whisk in the sugar until combined, followed by the lemon zest, lemon juice, and salt. Add the butter and cook over medium-low heat, stirring constantly, until the mixture thickens slightly and reaches 170 degrees, about 5 minutes. Pour the mixture through a fine-mesh strainer and into a heat-proof bowl; stir in the heavy cream.
  5. Pour the filling mixture into the warm tart shell. Place on a baking sheet and bake until the filling is shiny and opaque and the center jiggles slightly when shaken, about 10 to 15 minutes. Remove from oven and allow to cool completely to room temperature, about 1 1/2 hours, then refrigerate until ready to serve.

Read more at : loveandoliveoil

Sponsored video: Glorious Nothing Days by Anchor

0 nhận xét

This is such an apt topic for me to talk about, because I am a big fan of 'glorious nothing days.' Much to the extent that I wonder if I should be celebrating the 'doing something days' rather than the other way round. Any-ways, the point is that, everyone, even my energised, enthusiastic, husband has days when he wants to do nothing.

For me, a day like that would start off with waking up late, then a leisurely breakfast of coffee and pastry from the next door bakery and then sitting down with my laptop to catch up on stuff. Lunch would either be at the pub in the village or a late one with friends in a restaurant we've been dying to check out. The sun would be out, the shorts would be worn and there would be loads of cocktails and beers doing the rounds. We'd finish off with dessert and if we are not too tired, catch a movie or head back home and retire on the couch with some green tea and conversation. A day spent just the way you like.

Anchor's campaign 'Glorious Nothing Days' tells you to do just that. Sunny days spent at the park reading a book, or baking that cake you'd bookmarked aeon's ago, or deciding to suddenly go on a long drive or just staying at home in your pj's. Whatever be your scene, if you manage to take a snapshot of your perfect day by selecting four images to set the scene then you'll be in with a chance of winning a set of exclusive personalised Anchor aprons.

Head on over to the Anchor website for full details and also watch this cute video of 3 families enjoying their perfect day.

This is a sponsored video for Anchor

Cooking with Lactofree- Broccoli & Cauliflower cheese bake

0 nhận xét

IMG_3534
Around 2 weeks back I was invited to an exclusive Lactofree masterclass with Michelin starred chef, Tom Aikens. I had a crazy night the day before and waking up for a breakfast masterclass was a bit of a feat, and for a second (just a second) I wished I didn't have to go, but just snuggle in bed. I'm glad that thought didn't last long because I really did have a fab time. I reached just before the session started and so missed out on the lavish breakfast spread a la Lactofree. So with a cup of coffee in hand i joined the crew in the kitchen. Tom Aikens is quite a charming and patient chef. He talked about using Lactofree products in cooking and baking and how you get the delicious taste of real dairy, but without the lactose and since its made from cow's milk, you still get all its nutritional benefits too.

First up was Lacto(se)free raspberry, poppy seed and white chocolate muffins which Tom prepared right in front of us, and we even got to take home a few for tea. He then took us through a cooking demo of mushroom ragout on toast which we were then asked to recreate at our cooking stations. We went about creating our brunch dish with much enthusiasm and devoured into it with all the other bloggers. It was also the first time i cooked with and tasted sorrel leaves and chervil and it did make a whole lot of difference to the final dish. I'm sure i can use spinach and some other herb instead.
PicMonkey Collage
From the Lactofree samples in the goody bag, I ended up making a broc and cauliflower cheese bake and a chocolate-coffee panna cotta. My husband is lactose intolerant (self proclaimed) and he was happy he could have his coffee and tea with milk for a few days :)

Recipe adapted from here (serves 4 to 5)
IMG_3551 
Broccoli- cauliflower cheese bake
Broccoli florets- 3 cups
Cauliflower florets- 3 cups
Butter- 2 tbsp (I used Lactofree spreadable butter)
Plain flour- 1/4 cup
Spicy brown mustard- 1/2 tsp (optional)
Ground nutmeg- a generous pinch
Paprika- 1/2 tsp
Pepper- to taste
Salt- to taste
Milk- 2 cups (I used Lactofree semi-skimmed milk)
Cheese- 1 cup (I used Lactofree cheese) + enough to sprinkle on top
IMG_3528
Boil the broccoli and cauliflower in enough water for about 3 to 5 minutes. Make sure you dont cook it completely. It should still be crispy.
Drain in a colander and transfer to a large baking dish (9x 13 inch is what i used)
In a saucepan, melt the butter and stir in the flour to make a roux and add in the mustard, nutmeg, paprika, pepper and salt and continue to whisk till smooth.
Gradually add the milk and bring to a boil, while continuously whisking and making sure it doesnt stick to the bottom of the pan.
Once the milk mix had thickened a bit, stir in the cheese until it has melted.
Pour the mix over the vegetables and bake in an oven preheated at 200C for about 30 minutes.
Take the baking dish out of the oven, change the setting to broiler/grill, sprinkle some cheese on top and place under the broiler for another 7 to 8  minutes or until the cheese has melted.
Serve with garlic bread
IMG_3611
Here is the panna cotta recipe i used. I used Lactofree cream and milk for this recipe.

Notes: I have tried this with a Mexican cheese blend and it was fabulous
Of course, you can add other vegetables like carrots, spinach, leek etc.
The paprika gives it a punch, but feel free to omit if you dont want it spicy.

With thanks to Lactofree for inviting me to the event and for the samples, and Tom Aikens for the fabulous masterclass.

Burrata and heirloom tomato salad with Filippo Berio olive oil

0 nhận xét

IMG_3581
We have been blessed with some fabulous weather over the last few weeks and I'm so glad I don't have to drag on boots and heavy jackets any more. We have been spending weekends roaming around and catching up with friends and the blog has been consistently ignored. That doesn't mean I haven't been cooking, its just that I've gone on this crazy low-carb diet and so whip up something or the other as and when I want to eat, and salads being a star at most of our meals, I thought I should at least make an attempt to post one here.

Another reason for the salad, the gorgeous olive oil I've used in it. I was invited to an exclusive tasting event for the launch of the Filippo Berio Gran Cru range where the tasting expert talked us through the 3 exceptional regional Italian EVOO and then for a hands on cooking experience using them in regional Italian dishes. The evening started off as usual with some gorgeous wine and casual conversation and then moved on to the tasting session. After tasting the oils, we were all asked to write down the tasting notes and then compare it to the actual tasting notes, while gorging on some delicious focaccia made by the talented chefs at La Cucina Caldesi Cookery School.
reducedsize
(Photo courtesy: Filippo Berio)
We then moved on to the cooking session and I was in charge of frying the steak. It was an eye opener for me, as I always end up over doing my steak and here, the moment I put it on the pan, the chef would ask me to flip it and take it off. The dishes were all prepared using the 3 different Gran Cru oils- Dauna, Monti Iblei and Toscano and we were given a lot of tips on how to use these oils in cooking, baking, and as dips and dressings. After our laborious efforts, we sat down to eat what we cooked- Insalata di Arance Rosse (a blood orange salad), Steak Tagliata, and a pasta with greens and garlic croutons, which was my favourite of the 3. To finish off the evening, we all dug into some tasty biscotti and dessert wine and then headed home with a goody bag containing the Gran Cru range.

I myself just started cooking with olive oil and the event sure did help me figure out tastes, characteristics etc. It made me realise that cooking with a good brand of olive oil did make a lot of difference. I now regularly use the Gran Cru range and although they come at a hefty 9.99 quid a bottle, I think its worth it. I used the Toscano Gran Cru Extra Virgin in this recipe and it tasted fab. Ro clearly loved it as he was literally drinking the olive oil at the base of the salad bowl. There is no recipe as such. You just eye ball the quantity you want, mix it together and there, you have a fabulous summer salad. . Enjoy the sunny days ahead peeps! 

Serves 2 generously
PicMonkey Collage
Burrata- 200 gms
Heirloom tomatoes- 3 to 4 large, roughly chopped or sliced as rounds
Basil- a handful
Oregano- a few generous sprinkles
Pepper- to taste
Fleur de Sel- a generous sprinkle
Extra virgin olive oil- a good good glug (say around 1/4 cup)
IMG_3578 
Into a a salad bowl add the chopped tomatoes.
In a separate bowl, whisk together the basil, oregano, pepper, salt and EVOO and pour over the chopped tomatoes.
Give it a good stir, to evenly mix the dressing, but be careful to not break the tomatoes.
Let this sit aside for about 10 minutes, just to infuse the flavours.
When ready to serve, tear the Burrata into smaller pieces and add to the salad bowl. Gently mix.
Do a taste test, sprinkle some more Fleur de Sel on top, tear a few basil leaves and add if needed.
Serve immediately.
IMG_3587-1
Notes: Instead of Burrata, you can of course use Mozzarella. But once you've tasted Burrata, you'd never look back. Its basically an outer shell of mozzarella and an inner cream and butter centre. Yeah, I know!!! If only it was available in all super markets! I picked up mine from Waitrose.
Add some blood oranges and it would be even more refreshing. I couldn't get my hands on any. You can also substitute with red grapefruit if you like the tangy taste.
You can also do individual portions like i did, if you are doing it as part of a course.

With thanks to Filippo Berio for inviting me and Ro to the event and for the goody bag.

Parma Ham wrapped fish with pesto sauce

0 nhận xét

IMG_3369 
Last week I attended a cooking session hosted by The Consorzio del Proscuito di Parma at the Underground Cookery School. It was a day the tube strike was on and the Underground cookery school being really 'underground,' it was a bit of a feat to get there and also to find the place. But one glug of the chilled Processo, on arrival and I was ready to tackle the evening. 

We are big fans of cured meat and I even cook with it once in a while. My asparagus wrapped in Parma Ham is a hit at parties and the simple Parma Ham with mayo on toast is a regular at ours. Did you know that by law Parma Ham can only be produced in the Parma region using pigs born and bred in Italy? I had absolutely no idea. I also didn't know they were low in cholesterol and high in proteins..well, am I glad or what that I was invited to attend the hands-on cookery class with Parma Ham as the hero.

So after we were segregated into groups, we got around to our tasks. First up was making our own pasta. GULP! I've never done that before and although the kneading and mixing was not really new to me, the pasta maker did intimidate me a bit. Luckily, our chef was very patient and helpful and he guided us towards making fresh tagliatelle. The pasta maker did prove a bit difficult to handle in the beginning, but I soon got the hang of it and it ended up being a fun exercise. 
parma1
(Photo credit: Parma Ham event)
After the strands were hung out to dry, we moved on to getting dessert done. A stiff meringue was whipped and baked and the filling, some gorgeously tasty raspberry coulis was whisked with Chantilly cream and made into a roulade. How the Parma Ham was going to be incorporated into it was still a mystery. The final bit of the session was learning how to separate the legs, thighs and breast from a whole chicken (believe it or not, the first time I've ever done that) and then fill the breasts with a tarragon-cream cheese mix, wrap them in Parma Ham and baked.

We took our place at the table while the food was being plated and we chatted with fellow food bloggers over some delicious wine. First course was the tagliatelle we made, tossed with black pepper and truffle oil and topped with a generous sprinkling of Parma Ham and Parmigiano Reggiano. It tasted divine. Main course was the stuffed chicken wrapped in Parma Ham, fried to get the outside crisp, and then baked till done. This was served on a salad of new potatoes, spring onions, cress and purple sprouting broccoli. I loved how the dish looked and ate as much as I could, but was too full to finish the whole thing. I'm not a chicken breast fan, but this was nicely moist and not stringy and dry like other preparations. The grand finale, and perhaps my favourite was the dessert- meringue roulade with candied Parma Ham. This was mindlblowing good. I mean I would have never thought of adding parma Ham to the dessert, but this was really good. The salt for the ham went very well with the sweetness from the roulade and although I was terribly full, I ate the entire thing without flinching.

The evening ended with a nice cup of coffee and we were sent away with a goodie bag full of information and samples. With that I decided to make this fish wrapped in Parma Ham- my take on the main course- and threw in some veggies and a sauce to make a meal of it.
parma
(Photo credit: Parma Ham event)
Serves 2 as part of main meal
Italian Parma Ham- 6 to 8 thin slices
White firm fish- 250 gms (I used River Cobbler)
Salt & pepper- to taste
Sage leaves- 5 to 6 (optional)
Olive oil- 2 tbsp

New Potatoes- 4, quartered
Asparagus heads- 300 gms
Onion- 1 large, finely chopped
Basil pesto- 3 tsp
Spinach- 100 gms
Single cream- 1/2 cup
Salt- to taste
IMG_3370
Clean the fish, slice into smaller portions if they are too long and season well with salt and pepper.
Separate the Parma Ham slices and lay flat on a chopping board or plate. 
Place the fish slice on top and roll tightly. Use more than one slice of ham if needed. Keep aside.
Boil the potatoes and asparagus till done. Drain and keep aside.

Melt the butter in a large frying pan and when hot, fry the sage leaves till crisp.
Remove with a slotted spoon and drain on kitchen towels.
Into the same pan add the wrapped fish and fry on all sides till done.
Make sure you dont over cook this, or it will turn touch. Around 3 minutes on each side should be good if the fish is really fleshy.
Drain on paper towels and keep aside.
IMG_3360
Add some more oil into the same pan if needed and saute the onions till caramelised, around 5 minutes on medium heat.
Add the pesto and mix it all in.
Throw in the cooked potatoes, asparagus and spinach, mix it all in. 
Add salt and pepper to season.
Pour in around 1/4 cup of water and let it come to a simmer.
Reduce heat, pour in the cream and mix well. 
Add the fish, gently stir and cook closed for another 5 minutes, just so the fish takes in some of the pesto flavour.
Finally garnish with the fried sage leaves and serve with some crusty bread.

Notes: Follow the same method for chicken breast, but remember, cooking time will be longer.
The pesto flavour just comes through, if you want it stronger, add a tsp more

With thanks to The Consorzio del Proscuito di Parma for the event invite.

Easter special: Masala roast poussin (Murgh Musallam)

0 nhận xét

IMG_3242
I'm back after a fabulous weekend in Jersey Island with the husband, and the week before, a couple of us girls had taken off to the beautiful Cotswolds. The girls weekend away was so totally worth it, and we had some serious amounts of adventure, to say the least. From non stop gossip sessions, to happy hours at the tiny village we stayed in, to acting silly in the middle of the night, to having a flippin swan torture the daylights out of me, this trip shall never be forgotten. Without having time to get over the Cotswold trip, I packed my bags and joined the husband in the tiny, but gorgeous island of Jersey, 14 miles off the coast of France. We wined and dined in some amazing restaurants, explored the pristine beaches, spa-ed, got tanned and got back last night exhausted. Considering the fact that I had a hectic weekend, this post would not have happened any time now. But I promised a few I'd post this before Easter so they could try it out and I had to keep my word.

So- Murgh Musallam- from what I read up is a Mughlai dish, pretty rich in flavour and absolutely tasty. When Kulsum posted the recipe on her blog, I knew I had to try it. Each time I scouted for a chicken recipe, I'd land on this one, but I somehow thought it was a time-consuming one and left it for a day I was actually enthu to cook. Sadly, that day never came. But now that Easter is just a week away, I thought I should do a roast with an Indian twist and studied Kulsum's recipe again. Me being the lazy bum, went ahead and followed her recipe, but with the obvious short cuts. I just marinated everything together, added some potatoes and cooked it half on the stove top, and finished it off in the oven. The Gressingham poussins just made it even more easier, and somehow, roasting a whole bird gives it that fancy edge. They are absolutely easy to handle, and since they are small, the masala works its way into the thick breast bits, and takes much lesser time to cook. Gressingham also does duck, turkey, guinea fowl, quail etc, so if you're up to some experimenting this Easter, you know where to shop.

Add some baby carrots, parsnip, cauliflower etc and it can be an Indo-Western dish for sure. Its seriously tasty, especially the gravy, and the next day I had it with rice, and it was even better. I think traditionally its served on a bed of pulao and stuffed with eggs or something like that, but for me, this totally hit the spot.

Recipe adapted from here
IMG_3215 
Poussins- 2, approx 450gms each, skinned and cleaned (I used Gressingham poussins)
Baby potatoes- 6 to 8, quartered or halved depending on size

To grind
Fried onions- 4 tbsp* (refer notes)
Cumin seeds- 1 tsp
Coriander seeds- 1 tsp
Cloves- 2
Cardamom pod- 1
Poppy seeds- 1 tbsp
Chilli powder- 1 1/2 tsp
Black peppercorns- 1 tsp
Garam masala- 1 tsp
Powdered almonds- 1 tbsp

Ginger paste- 1 tbsp
Garlic paste- 1 tbsp
Green chillies- 2, small, finely chopped
Tomato paste- 1 tsp
Yoghurt- 4 tbsp
Salt- to taste
Ghee- 1 tbsp
Oil- 1 tbsp
IMG_3225
Grind together all the ingredients under the 'to grind' section. Transfer to a bowl.
To this, add the ginger and garlic paste, green chillies, tomato paste, yoghurt and salt and mix well to get a thick paste. 
Add a few tea spoons of water if you think the mixture is too thick.
Place the poussin's on a plate and make long insertions on the flesh (for the marinade to seep in).
Generously apply the marinade on to the birds, and also stuff some into the cavity, reserving about 2 tbsp of it for later use.
Cover with cling film and marinate in the refrigerator for at least an hour. I had time, so i kept it in there for about 2 to 3 hours. Best left over night I believe, but who has that sort of time and patience ;)

When ready to cook, heat a deep pot/pan, large enough to fit the 2 birds and pour in the oil and ghee.
When really hot, add the poussins one after the other, and sear on all sides.
You don't need to cook the chicken here, just need it to be lightly browned all around. Its a bit difficult to move them around, so I used my big kitchen tongs to flip it and such. 
Once the chicken is nicely seared on all sides, take them out and drain on paper towels.
Into the oil (add a bit more, if there isn't much remaining in the pan), add all the remaining marinade. Scrape the bowl clean.
Sauté for a couple of minutes, till the raw smell disappears.
Into the masala add the baby potatoes and fry for about 2 to 3 minutes, making sure the potatoes are well coated in the masala.
Return the poussins back into the pan, adjust the potatoes around them, add about 1/4 cup of water and cover and cook on medium heat.
Keep checking in between to make sure it doesn't burn and if you feel its getting too dry, then just add more water. I did add a 1/4 cup more.
Keep pouring the gravy on top of the poussins to keep them moist, and also try and stir the potatoes without breaking them.
Once both the potatoes and poussins are cooked (check by inserting a knife into the most thickest part of the bird and if juices run clear, you are good to go), transfer them into a baking dish along with all the gravy/
Grill under the broiler for about 10 minutes, just to crisp the tops. Of course, this step is purely optional.
Once done, take the dish out and let it rest for about 5 minutes, before you attack.
Serve with crusty bread and salad, or even with rice and roti.
IMG_3199
Notes: *The fried onions I used were store bought. If you don't have that option, then deep fry 2 small red onions till brown and crisp and use that instead. Make sure you don't burn them, or else they would taste bitter.
Use 2 tbsp vegetable/ olive oil instead of ghee.
You can of course use one chicken instead of two small poussins.

Sponsored video: #GETSQUASHD with Robinsons

0 nhận xét

I loved the movie Gravity. Well loved it mostly because of George Clooney and after they killed him off (sorry for the spoiler, but I presume most of you would have seen the movie by now)..which was after the first half hour or so, I kinda lost interest. I still sat through the movie, but wishing Mr Clooney would miraculously appear. The movie went on to win 7 Oscars including Best Visual Effects... which brings me to the #GETSQUASHD campaign by Robinsons (yes, the squash people). These sachets of squash are small enough to fit in your pocket but is strong enough to make quite a few glasses of drinks. I'm definitely going to try it out, especially the apple flavour.

Robinsons decided to take things to a different level by challenging the Oscar winning VFX team behind Gravity to GET SQUASHD in zero gravity. Do they succeed in doing so? Well, you will just have to watch the video and find out for yourself. 

The best part however is that you could take on the challenge to GETSQUASHD as well. All you need to do is put a Robinsons SQUASH'D in your pocket, get out there and #GETSQUASHD and send over the proof. You could be the lucky one to win a GoPro Hero 3.

Check out the other entries and upload your own #GETSQUASHD video on their website

This is a sponsored post for Robinsons

Macarons for grown ups- Cosmopolitan and Mojito macarons

0 nhận xét

IMG_2883-1
OK! I'm super duper excited about these macaron flavours and even more about the photographs, that turned out exactly the way i imagined. It was a crazy week of baking for us at Bobo Macarons. More than 1000 macarons baked, printed, filled and packed for a wedding and I was beyond exhausted. I did not want to do any baking for a really long time, or so I thought, until this fabulous idea for flavours developed in my head. I HAD to make it immediately. And so I did.
IMG_2844
I decided to go with two of my favourite cocktails- Mojito and Cosmopolitan. I make these at home quite often and I'm soooo in love with the flavours, it HAD to work in a macaron. I must admit though, it wasn't easy. I wasn't sure how to make the flavours pop and if adding liquid to the filling was a good idea, but I had to give it a go to see if it was feasible...and well, here they are...spot on with the cocktail flavours. Next on the list is margarita and sangria and maybe even a pink champagne one ;)

I have a basic macaron recipe that I fall back on and it fetches me perfect results. I halved the batter and added hot pink to one set and kiwi green to the other. I got 12 macarons in each colour. For the mojito macarons, I grated some lime zest and sprinkled over the shells about 10 minutes after I piped them out. This totally made a difference.

Mojito Macarons
IMG_2889
The mojito ones- lime, mint and rum being the main ingredients, were easy to put together. I mean I decided to do a white chocolate ganache filling and incorporate these flavours into it, keeping the base simple. I would however increase the alcohol a bit more the next time, as the lime was overpowering (in a good way, of course) with this batch. I'm so kicked about how the styling for this came through and its one of my favourite shoots till date.

Double cream- 45ml + 1/4 to 1/3rd cup to whip
White chocolate- 2 oz, roughly chopped
White rum- 1 tbsp
Lime juice- 3 tbsp
Lime zest- of one lime
Mint leaves- 2 to 3, finely chopped
IMG_2877
Gently heat the double cream, either in a sauce pan, or in the microwave and pour over the chopped up white chocolate. Keep aside for a couple of minutes.
Gently stir, without incorporating air into it, till you get a smooth mix. Keep aside to cool.
Add the rum, lime juice, lime zest and chopped up mint leaves and mix it in well.
Keep refrigerated till ready to use.

When ready to pipe, whip the ganache with 1/4 to 1/3rd cup of double cream with a hand held blender or in a free standing mixes with whisk attachment, till stiff peaks form. Make sure you don't over do this, or you'll end up with split cream.
Transfer into piping bags and pipe on to macarons and sandwich them.
Keep refrigerated in an air tight container till ready to use.

Cosmopolitan Macarons
IMG_2839
These - taste wise- were spot on but I did have a bit of trouble getting the right consistency. I used a butter cream filling for the macs and the amount of liquid that went into it, made it a lot difficult. I know that vodka is an important component in a cosmo, but i shied away from it because of the Cointreau and cran juice that was already making it quite fluid. I had to keep adding icing sugar to reach the desired consistency, which meant, the filling was a bit too sweet for my liking. I will find a way to work around that, but for now here's the recipe. 

Unsalted butter- 55 gms, at room temperature
Icing sugar- 6 tbsp
Cointreau- 1 tbsp
Cranberry juice- 1 tbsp
Orange zest- 1/4 tsp (optional)
IMG_2853
Beat together the butter and icing sugar till light and fluffy.
Add all the liquid ingredients plus zest and continue beating till they all come together.
If the mix looks like its curdled, add some more icing sugar to bring it back to desired consistency.

Beef Moussaka

0 nhận xét

IMG_2758
My boss is a brilliant cook- you know- the types that can whip up something with whatever is in the pantry and make a fabulous meal out of it. She refuses to let me take lunch to work which means I get to enjoy her fabulous cooking. I have learnt so many new methods of cooking, easy to make dishes and new ingredient names, and always come back home and try them out much to Ro's amusement. He's secretly thanking her, I'm sure :) 

Last week I was whining to her about how planning daily meals were such a feat and she gave me this idea to cook with aubergines. Both Ro and I were not aubergine fans till a while back when we went to an aunts place for lunch and she served baingan bhartha with biryani. We loved it so much that we got the recipe from her and tried it at home. As expected, it wasn't even close to what we had in mind and so gave up. After that, I may have tried working with aubergines about 5 or 6 times and 3 of those (successful ones) have appeared on the blog (actually one of it is what my friend Rashida made and sent over, so not counted). Aubergine parmigiana was another successful one and we loved it, but pictures were rubbish and hence couldn't blog it. 
IMG_2747
So anyways, Dora gave me this really easy recipe to cook with aubergines and I got all worked up at how easy it was. But of course on the 1 hour train ride back home from work my mind decided to go on overdrive and research aubergine recipes. Moussaka was up there on search results and yes, it had to be made that evening. I went straight to the grocery store to pick up ingredients (of course got carried away and bought a whole lot of other rubbish as well) and came back home all ready to cook. Its a bloody long process- this thing called Moussaka. When I read the recipe, I had no idea how tedious it was and many times during the process I wanted to just cut it short and make something else out of it. The fact that I could make a blog post out of this was at the back of my mind and I think that's what made me determined enough to continue with the actual process. (Some good has come out of owning a blog i guess??)

At the end of it all, I must admit, it was thoroughly worth it, like really really worth it. Both Ro and I enjoyed it and I made a note to experiment with aubergine again. I served it with a fabulous salad I learnt from an aunt this time i was in India (will try and blog it some other time) and a gorgeous bottle of red.

Word of caution: Attempt ONLY when you have time.

Recipe adapted from here (serves 3 generously)
IMG_2749 
Olive oil- 2 tbsp
Onion- 1 large, finely chopped
Garlic- 4 cloves, peeled and finely chopped
Minced beef- 450 gms
Cinnamon powder- 1/4 tsp
Oregano- 1/2 tbsp, dried
Allspice- 1/4 tsp
Bay leaf- 1
Thyme leaves- 1/2 tsp, dried
Tinned, chopped tomatoes- 1, 400 gm tin
Dry white wine- 90ml
Aubergines- 3 medium, cut into 1 cm slices
Pepper- to taste
Salt- to taste

Bechamel sauce (topping)
Butter- 45 gms, unsalted
Plain flour- 45 gms
Milk- 450ml
Parmesan cheese- 45 gms
Gruyère cheese- 50 gms, grated
Egg yolks- 2
IMG_2750
Place the sliced aubergines in a large bowl, sprinkle with salt and leave aside for about 30 minutes. This will draw out any bitter juices.
Heat the oil in a frying pan and cook the onions for about 10 minutes on medium heat. The onions should turn soft, but not brown.
Add garlic and sauté for a couple more minutes.
Into this add the mince meat and break it up, while mixing it into the sauteed onions.
Stir in the cinnamon, oregano, allspice, thyme and bay leaves followed by chopped tomatoes. Stir it all together till well combined.
De-glaze the pan with white wine, season with enough salt and pepper and cover and cook for another 15 minutes or so on medium heat, till the meat is cooked and the mix is thick.
Once the sauce is ready, cover and keep aside

While the meat is being cooked, you can deal with the aubergines.
Preheat oven to 200C
Rinse the aubergines in a colander and pat dry with a kitchen towel.
Toss with some olive oil and line on 2 baking trays, trying not to overlap.
Bake for 20 to 25 minutes, or till the slices turn a light brown.
IMG_2735-1 
To make the bechamel sauce, melt the butter in a saucepan and stir in the flour.
Take off heat and slowly whisk in the milk.
Return pan to heat and continue stirring till the sauce thickens.
Simmer for a further 5 minutes on low heat and then remove from heat.
Stir in around 30 gms of parmesan and gruyere cheese, season with salt and pepper and keep aside to cool lightly.
Once cool, whisk in the egg yolks till no trace is visible.

Once all the preparation is done, you can assemble the moussaka.
Into a large baking casserole/ dish generously spread a third of the mince.
Cover with aubergine slices, overlapping each other.
Repeat the layers, ending with a final layer of the mince.
Finally pour over the bechamel sauce, sprinkle both the remaining cheese and bake for 40 to 50 minutes or till it bubbling and golden on top.
Take the casserole out of the oven, leave aside to settle for about 5 minutes before slicing and serving.
IMG_2743
Notes: Yes, its a frikkin long recipe and procedure. Atleast 2 hours including prep and cooking
Bechamel sauce can be made a day or 2 ahead and refrigerated in an air tight container
Try and serve it with a refreshing salad or some bread, to cut through the grease and cream.
Traditionally Moussaka is made with lamb mince but I'm not a big lamb fan, hence used minced beef. Feel free to replace the beef with lamb mince. 

Beaten coffee (Indian Cappuccino- without a fancy machine)

0 nhận xét

IMG_2693
I love my morning cup of coffee. Or rather used to. Now I just drink that pathetic coffee from a cafetiere, that too sometimes after about an hour or so after its made. I remember being fussy about my morning coffee and I also remember having to let go of that fuss just because making a decent South Indian style filter coffee was just too much work, first thing in the morning. This way, Ro makes us both coffee in the morning and I just gulp down that watery concoction without any complaint. Well I did complain about my lack of a decent coffee once in a while, and my request for one of those fancy Nespresso, cappuccino makers fell on deaf ears. Instead, me and my girl pals go and indulge in an expensive cup of coffee at one of those artisan coffee shops once in a while. No its doesn't solve anything, rather it just makes things worse because you'd know what a good coffee actually tastes like.

I get this coffee fetish from my mom i suppose. She makes the best coffee and I kind of miss that now, especially because I got to enjoy it almost every morning last month. She likes it super duper strong with loads of sugar, and what do you know..i like it exactly that way too. This coffee drink, very similar to a cappuccino in taste, was made quite regularly this time. If decoction coffee was not available (since it takes a while to make), this was the coffee of choice. I learnt how to make it, for those evenings you crave a good cup of coffee and of course, to remember home where everything was just perfect. 
IMG_2704
The trick is to froth up the mixture and the quantity of milk makes that happen. Keep adding a few drops to start with and slowly increase, if you feel its needed to get the mix going. It loosens up after a few stirs and so add only after you do so. There is no particular recipe for this coffee, its more like a do-as-per-your-taste kind of a thing, but just for keepsake, here's an outline of what goes into it. Really, try this out and you wont ever need a fancy machine at home.

PS: A special thanks to my good friend Rashida for sourcing that gorgeous chai carrier from a chai wallah. I know she went through quite a bit of trouble to get the authentic one and I am so glad I have friends like these who absolutely understand my prop obsession. 
A big hug to Manjiri who brought me tea glasses from Mumbai to complete the whole look. Thanks darl.
And lastly, a group hug to my mum, my aunts and my neighbours back home who I harassed non stop for those thin cut glasses (the one you see in the foreground) that are extinct in Kerala (apparently), and to the old uncle who let me raid his shelf to find 2 that fit my imagination perfectly well. :)

Makes 2 (strong) cups
IMG_2724
Instant coffee powder/granules- 2 tbsp (reduce it if you don't like your coffee too strong)
Sugar- 4 to 5 tsp (adjust according to taste)
Milk- 1 1/2 cups (at least 4 % fat)
Water- 1/2 cup
IMG_2726
Tip in the coffee powder, sugar and 1 tsp cold milk into a cup large enough to handle 2 cups of liquid. I used my measuring cup for this.
Using a spoon, vigorously mix it all up, like it stirring motions. The mix would be dark, almost blackish in colour when you start off and as you keep mixing, the colour would lighten and slowly start getting creamy and frothy.
Keep stirring (vigorously being the key word) till the mix turns to a light brown colour.. I wish i could explain this better, but you'll understand when you see it. It would be significantly different from what you started with.
Keep this mix aside.
Bring the milk and water to a boil a saucepan. 
Give the coffee mix one last proper stir and into it pour the boiled milk..slowly.
Mix gently, do a taste test for sugar , pour into individual mugs and enjoy.
IMG_2706
Notes: As you can see from the picture, my coffee was really strong which invariably means I need more sugar. You know how much sugar and coffee you need so add accordingly. The only thing to remember is the milk. Add just a few drops, enough to get the mix moist. If there's a lot of liquid then it doesn't foam up too much.
A milk frother should be able to make the stirring a bit easier. Haven't tried it, so don't take my word for it.
You can do the same with cocoa, sugar and milk too
I've said at least 4% fat is a must. But if you are using low fat milk, then make that 2 cups and omit the water.

Launching People- a celebrity mentorship programme by Samsung

0 nhận xét

Here's a platform for all you film makers, singers, foodies and photographers. Samsung is joining hands with UK's hottest talent to give people an opportunity of a lifetime. 'Launching People' is a programme that will aim at helping those who want to launch a career in the respective fields. These talented artists along with Samsung, will search high and low for undiscovered talent in the country. They would aim at finding people with extraordinary potential and original ideas. The chosen candidates would then be guided on a one-on-one basis by their inspirational mentor and work towards creating a unique project. The journey from selecting the candidate, to working with the mentors, to finally launching the project will be documented and aired on television later in the year.

The celebrity mentors are:
Idris Elba- award winning actor, producer and DJ for the film category
Singer-songwriter, performer and actress Paloma Faith for the music category
For the food segment, Gizzi Erskine- the leading pop up chef and food writer and
Rankin who is a world famous portrait and fashion photographer mentoring the photography segment.

If you are food lover, budding film maker, musical game changer or photographer, then use this platform to pitch your brilliant ideas to those who are good in what they do, and can mentor you towards a great career. Andy Griffiths, President of Samsung UK and Ireland says, 'Everyone knows Samsung for launching products and every day we’re inspired by people who use those products to achieve amazing things. ‘Launching People’ is all about doing just that – launching people’s potential through technology, whatever their stage in life. We hope to give people with passion, ambition and a hungry mind, a launch pad for their bright ideas and change their lives in a positive way.'  

For us foodies, here's what Gizzi Erskine has to say. She is looking for someone who has passion and knowledge about food, and who is happy to be a little unconventional and break the rules. I'm sure there are readers out there who fit this bill to the T. Even if you don't, there is no harm in giving it a go. Who knows, maybe you'll be the next big thing in the food industry :)

This is how you can get involved:
Make a 2 minute video all about you and your ambition - a perfect chance to show off your passion, personality and your project idea to get the attention of the mentors. Add an image to it along with some copy and you're good to go. Log on to www.launchingpeople.co.uk to find out more, and you can also upload your submission there.

Up for grabs:
There are 2 opportunities for everyone:
1. The mentors will select four candidates with whom they'll work one-to-one. The chosen proteges will spend 2 to 3 weeks together, working closely with their mentors in a house fully furnished with Samsung's latest technology on their personal projects, building towards a grand launch event and making their ideas and ambitions a reality.
2. The public will get to vote for one winner in each category to receive GBP 500 for personal tuition and Samsung technology up to the value of GBP 2000.

Submissions are open till Thursday 6th March, 2014, and the final four will feature in a television series which will air on TV in spring this year
The 'People's Choice' winners, voted for by the public on Facebook, will be announced on Friday 7th March, 2014

There are so many of you out there who are so good in what you do, but have not been given an opportunity to shine in the field. So make use of this fabulous opportunity Samsung has put forth and make yourself proud.

Disclaimer: This is a featured post for Samsung. All views and opinions are my own. Photographs and videos are courtesy of Samsung Launching People.

Lemon madeleines

0 nhận xét

I know this post was supposed to go up a couple of weeks back, but that was me being optimistic about posting stuff on the blog from home. Horrible internet connection and working on a tablet is not really a favourite thing, and to add to it, blogger or flickr - one of these- were acting up, forbidding me to place images the way I want. Anyways, I had to have the post up and running because as part of my New Year resolution, at least a recipe post a week on the blog was a must. I actually don't have anything else in my drafts and if i need to keep with the resolution:
1. The weather must be significantly better for me to (want to) take pictures
2. I should get off my lazy ass and cook
3. I should unpack my bags and dig out the props i bought from India (really cool ones BTW)
4. I should get off my lazy ass and COOK!!!

After diving straight into work, today is my day off and I don't see any of the above happening. Its Valentine's day, and what I should actually be doing is to cook up a storm for Ro (who couldn't care less about VD) and then cuddle up and watch a movie or something. But all I'm thinking of is what cocktail I can make with the new bottle of Cointreau I picked up from duty free and how many varieties I can whip up with the mixers lying around home. (It's only 11.30am btw! Do I have a drinking problem??? No don't answer that). Its raining and unbelievably windy and I don't want to cant go out. Oh, and Ro is working from home and in about 15 minutes he's going to ask me 'what's for lunch.' I'm going to reply 'love and fresh air,' and then it might end up in an argument and we'd be the awesome couple who fights on every VD.
Ok so madeleines. When I visited Paris last September with my blog buds, one of the things on my 'to buy list' was a madeleine tray. We visited a couple of stores that sell cooking paraphernalia and they all had gorgeous madeleine trays, but bloody expensive. So I conveniently forgot about it and instead came back home with other rubbish.  

Imagine my excitement when I found a similar tray in TKMaxx for a third of the price. I had to pick it up and make madeleines immediately. So I did and they came out perfectly well. Its so easy to incorporate a flavour of choice into these and I chose lemon- i used my home made extract. Its just a basic sponge recipe and I'm sure you can make it without the molds, but then they wont be called madeleines, will they? I once saw a post trending on Pinterest where oven safe spoons replace the molds. They don't give you the bump, but they do look pretty madeleine like and is a substitute for the tray. 

Enjoy!

Recipe adapted from here (makes 18, 8cm madeleines)
Eggs- 3 large, at room temperature
Granulated sugar- 1/2 cup
Dark brown sugar- 2 tbsp
Butter- 1/2 cup
Plain flour- 1 cup
Baking powder- 1/2 tsp
Salt- a pinch
Vanilla extract- 1 tsp
Lemon extract- 1/2 tsp
Lemon zest- 1 tsp, freshly grated
Whisk together the flour, baking powder and salt in a bowl and keep aside.
Beat together the eggs and both the sugars on high speed, either in a free standing mixer with whisk attachment, or using a hand whisk, for about 5 to 8 minutes or till pale and thick.
While the egg mix is being whisked, melt the butter in a saucepan and keep aside. It should be warm to touch.
Into the egg mix add the vanilla and lemon extracts and the lemon zest and whisk till just combined.
Sift in the flour mix bit by bit, folding well after each addition. Do this slowly and carefully, as you don't want to deflate the egg mix. I used a silicone spatula to fold it in.
Take about 1 cup of this batter and mix it with the warm melted butter.
Whisk it in really well to make sure the butter has been nicely mixed in with the batter.
Add this to the remaining egg batter and gently fold it in till well mixed. (Its easier to mix a bit of the batter with the melted butter and then add that to the bigger batch. You also don't end up deflating the mix too much.)
Cover with a cling film and refrigerate for a minimum of 1 hour. You can also keep it up to 3 days in the fridge.
When ready to bake, preheat oven to 190C and generously grease a 2 12 mold madeleine trays with melted butter using a pastry brush. Also dust the molds with plain flour (tapping out the excess) to be on the safer side.
Drop a tbsp each of batter into each mold. It will be slightly domed in the centre which is precisely what you want.
Bake for about 9 to 11 minutes or just until the cake springs back when touched with a finger, or till the edges turn a light brown. Don't over bake it.
Take the pans out of the oven and immediately tap out the madeleines on to a wire rack.
Dust with some icing sugar and serve immediately with a cup of coffee.

Notes: I had only one 12 mold tray and so after i finished baking the first batch, i kept it aside for a few minutes to cool down and then repeated the greasing process. The dough was kept back in the fridge while the first batch was baking. The second batch also came out perfectly fine for me.
The madeleines are best had immediately, but it can also be stored up to 3 days in an air tight container in the fridge.

Chinese takeaway pairing with Cotes du Rhone Wines

0 nhận xét

I'm back after my month long vacation and I'm lethargic, to say the least. I had a great time travelling to Chennai and Bangalore, meeting up with family and friends and needless to say, gorging on mallu food day in and out. I fell sick twice, lost my voice, had to take 2 courses of antibiotics (something i hadn't done in years) and had an allergic reaction to a facial at the beauty parlour. Not so much fun, if you actually think about it. But I refused to let these issues dampen my spirits and still went about doing all those things I was asked not to do (like binging on street food) and gained a few kilos (damn you..slow metabolism).

So anyways, I'm back, and although the husband was holding fort while I was away, he looked mighty pleased to have me back (or so Id like to think)... even if its just to nag me. First thing out of his mouth was, 'can you make me a lemon drizzle cake please' to which my answer was 'no i need to make a lava cake because i have a submission in 2 days.' So poor thing ate the not-so-great lava cake and sat and listened to all my India stories. Getting back to cooking is kind of challenging for me even after a 2 day break from the kitchen, so imagine a whole month away from such activities? Torture!
The Chinese takeaway pairing challenge with Cotes du Rhones Wines came around at the perfect time and we thoroughly enjoyed a night in with glasses of red and some delicious Chinese food. The challenge was to show how easily the wines can be paired with all sorts of food, and since the Chinese New Year just got over, pairing the Cotes du Rhones wines with Chinese food was just apt. At this point I must tell you that Ro is a sucker for Chinese food. He can have it 365 days of the year and still drool at the thought of spicy pork ribs. I, on the other hand, like it but cant have it every other day and most certainly not the same thing every single time. But this time, being authentic-Chinese-food-deprived for so long, I thoroughly enjoyed all the usual stuff we order from our favourite Chinese joint, a stones throw away from home.

We ordered some fried prawns in butter and garlic as starter and stir fried mixed vegetables, Duck in chilli and black bean sauce and Singapore vermicelli noodles as part of mains. Opened the bottle of La Reserve de Camille Cayran - a smooth red, to serve with the prawn starter and at first i didn't quite enjoy the taste. A couple of sips later and I could vaguely figure out the fruity flavours. The smoothness broke down the grease from the butter and wiped out the pungent garlic taste which I'm not sure was what i was looking for, but it somehow complemented each other. The husband declared that the wine flavours were a bit too overpowering for the prawn starter.
The Cotes du Rhone Vidal Fleury, the blood red, almost blackish like wine was quite good on the lips. Medium bodied and quite an easy wine to pair i think, since it tasted fab with the slightly spicy vermicelli noodles and was absolutely gorgeous with the duck in black bean sauce. Both the wines failed to match with the stir fried vegetables, but that's just because the dish was pretty bland and didn't have any flavour attached to it. The wines just completely took over the flavour. Not complaining because we absolutely enjoyed the wines with the meal whatsoever.

We usually prefer a chilled beer or cider with our Chinese takeaway, and although we'd tried it a couple of times before with Chinese food made at home with less oil and salt, we were a bit apprehensive as to how we would make the match work with a takeaway option. With the slight miscalculation of the vegetable stir fry, i can very well say that the pairings were pretty decent and we'd definitely think about doing more wine pairings with everyday food. Opening 2 bottles of wine was not a good idea as we both went to bed pretty "content" :). We still have some more wine to polish off and maybe ill try and whip up a stir fry at home to go with that.

Cheers :)

With thanks to Rhone wines for inviting me to take part in this challenge and for the 2 bottles of wine that was sent over for the challenge. The bill for the takeaway was reimbursed.
Please drink responsibly. Visit drinkaware for more info.

 
  • The Best Blog Recipes © 2012 | Designed by Rumah Dijual, in collaboration with Web Hosting , Blogger Templates and WP Themes